
Custom Visit Templates
Custom Visit Templates
What: A tool in the Provider File for designing your own consultation fields checklists, notes, numbers, dates grouped under the Symptoms and Examination tabs, then applied to a real consultation in one click.
Why: Healthbridge Clinical's default consultation flow is built around general practice. Custom Visit Templates let any provider: a psychologist, a nurse running a wound-care clinic, an occupational health practice build their own workflow-specific questions instead of working around a GP-shaped form. Everything captured still feeds into the Clinical Assistant's document generators.
When: Set up once per visit type you want to standardise, a screening, an occupational health exam, a certificate check then select it from the 'Custom Templates' list on the Symptoms tab any time a matching patient comes in.
Steps
1. Turn on the sections you want to build fields for
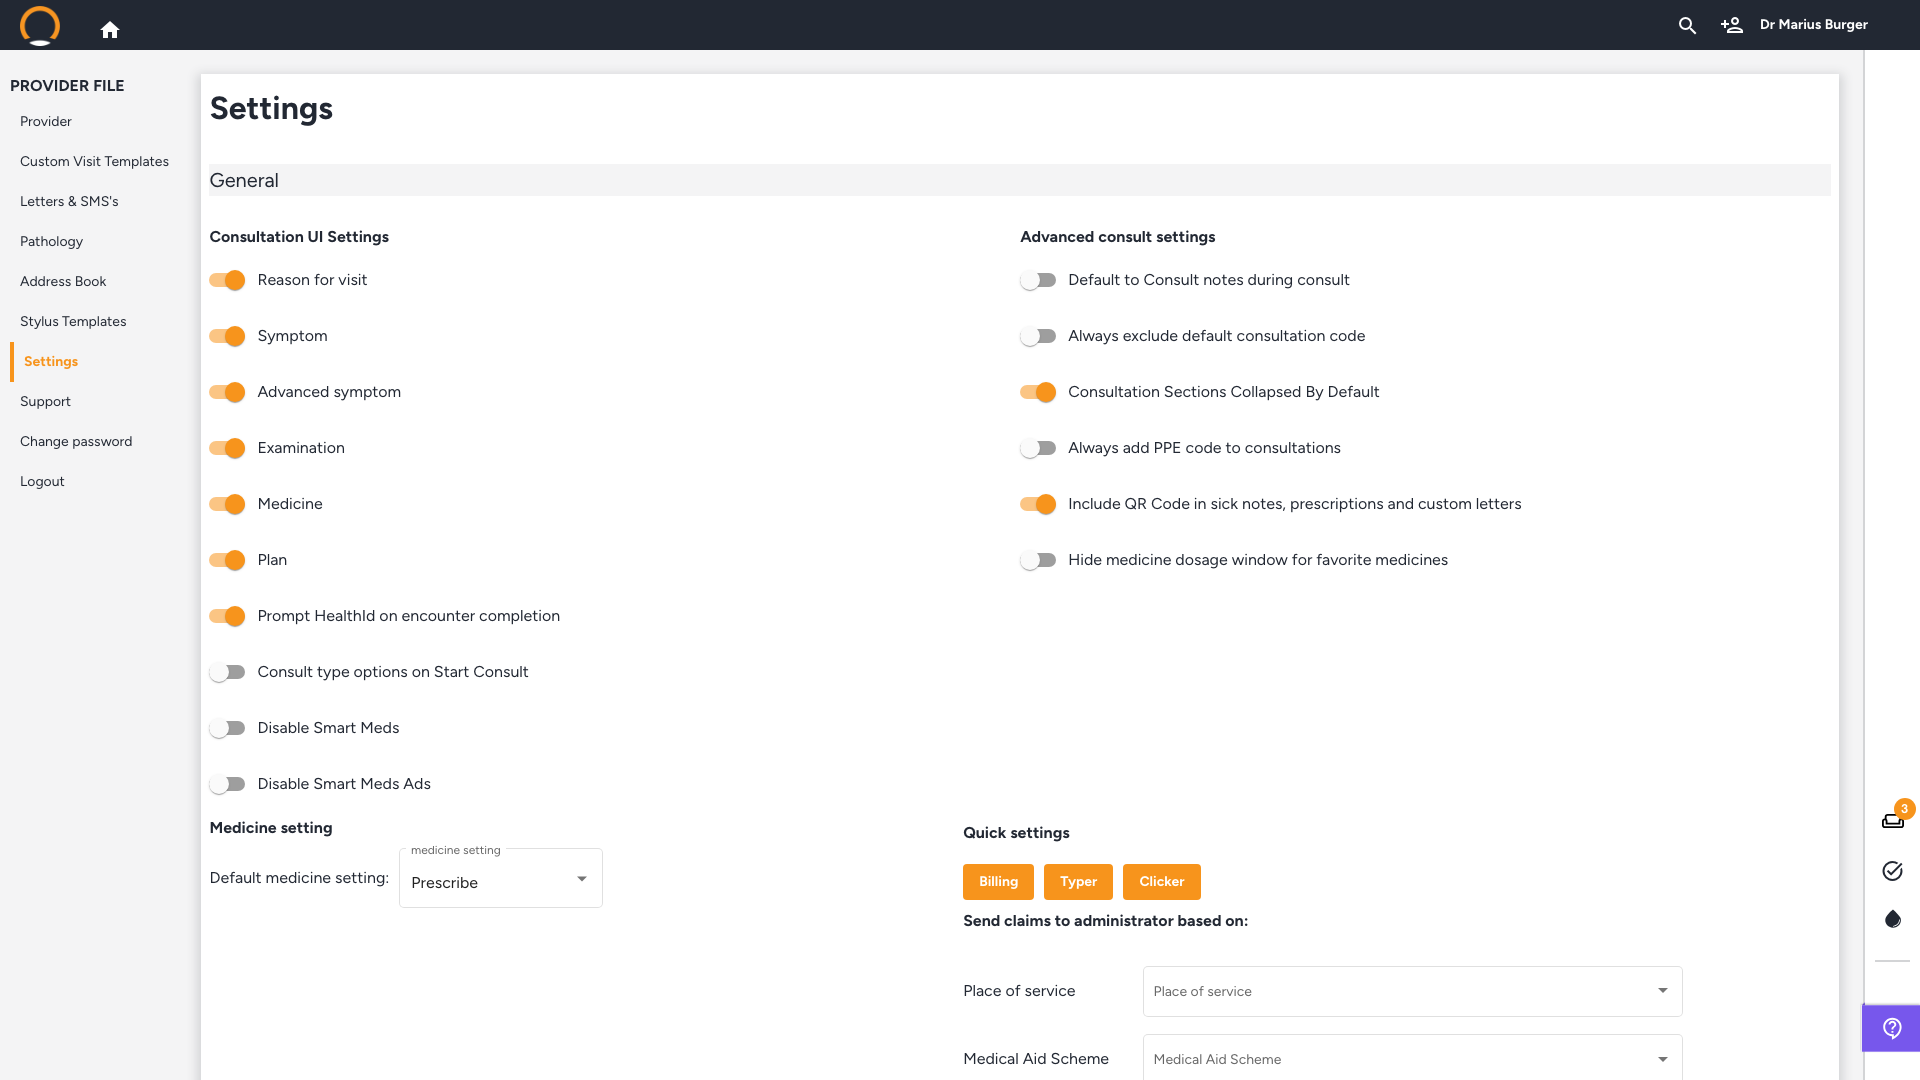
Location: Provider name (top-right) › Settings › Consultation UI Settings
A template's fields can only appear on a consultation tab that's actually switched on. Click your provider name, click 'Settings', and check the 'Symptom' and 'Advanced symptom' toggles under 'Consultation UI Settings' these control the Symptoms tab. 'Examination' controls the Examination tab. If a toggle is off, turn it on before you start building.
2. Open Custom Visit Templates and name a new template
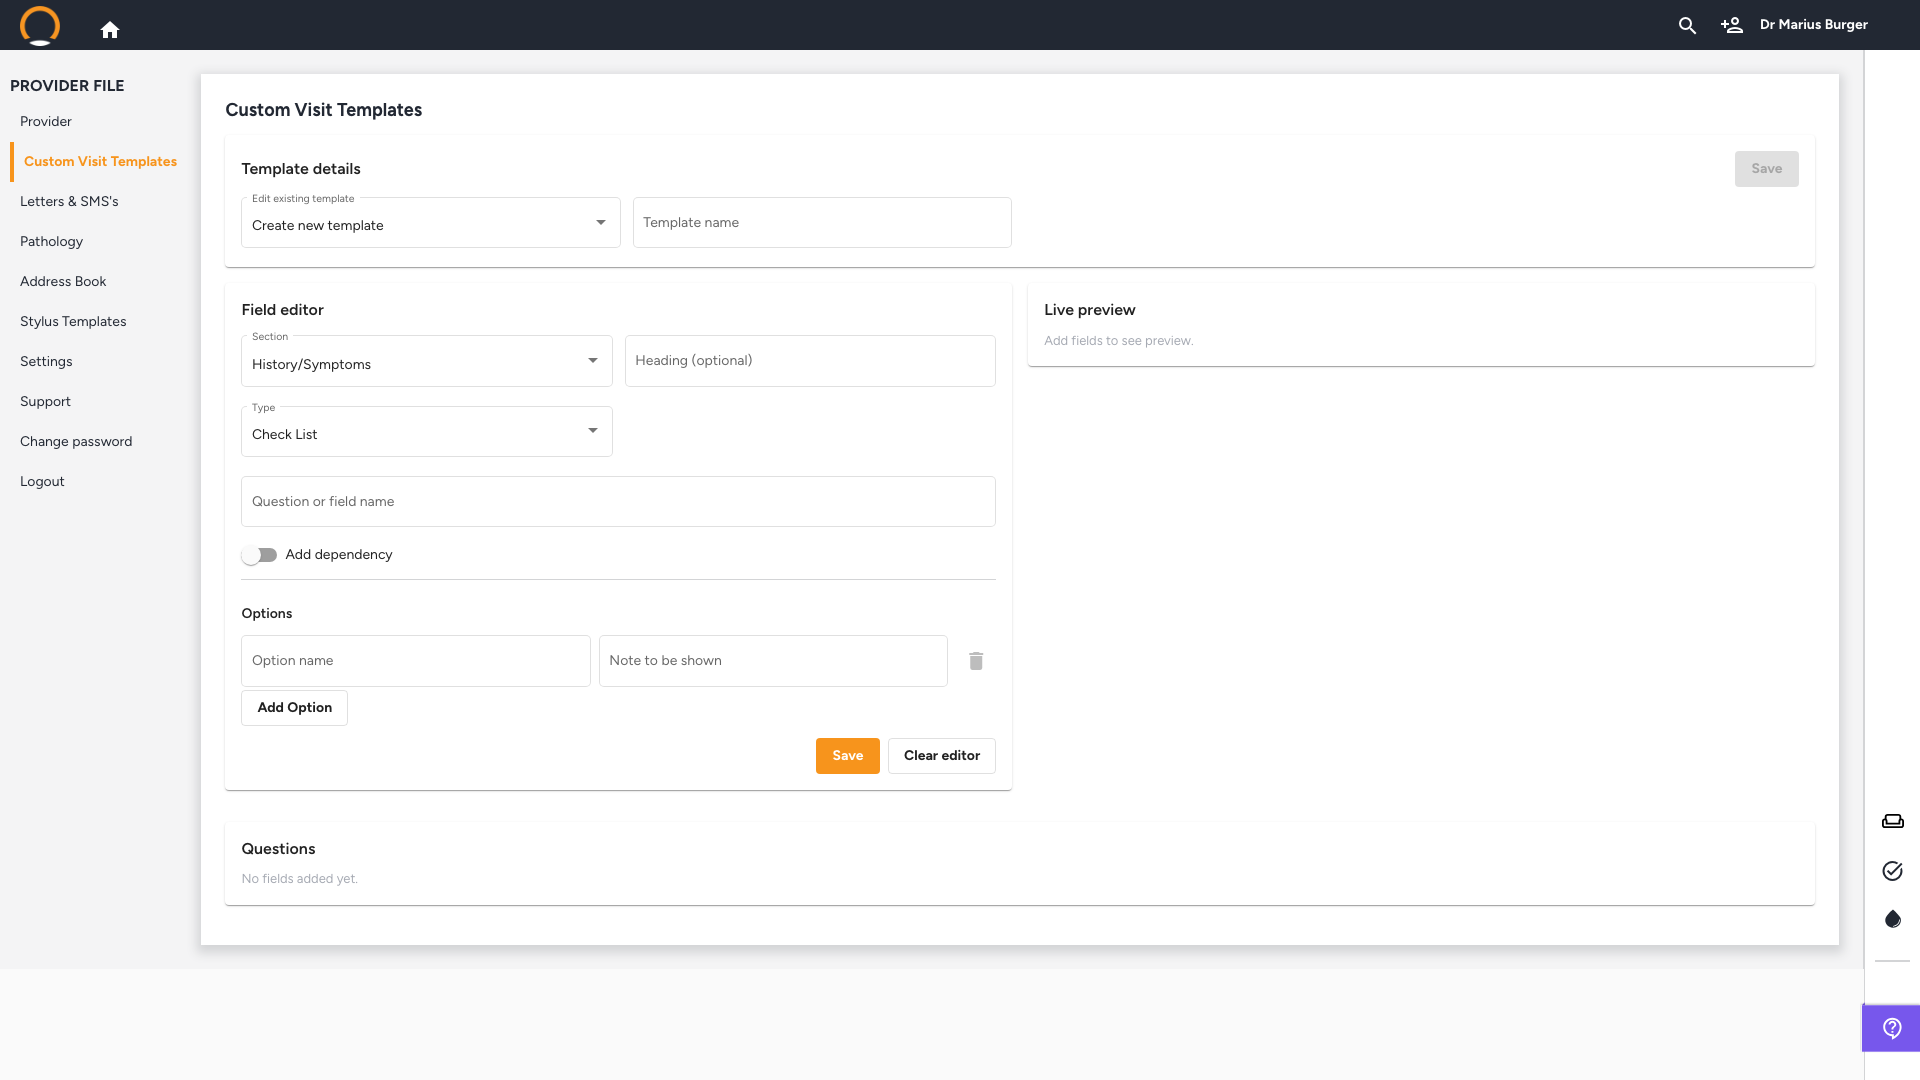
Location: Provider name › Custom Visit Templates
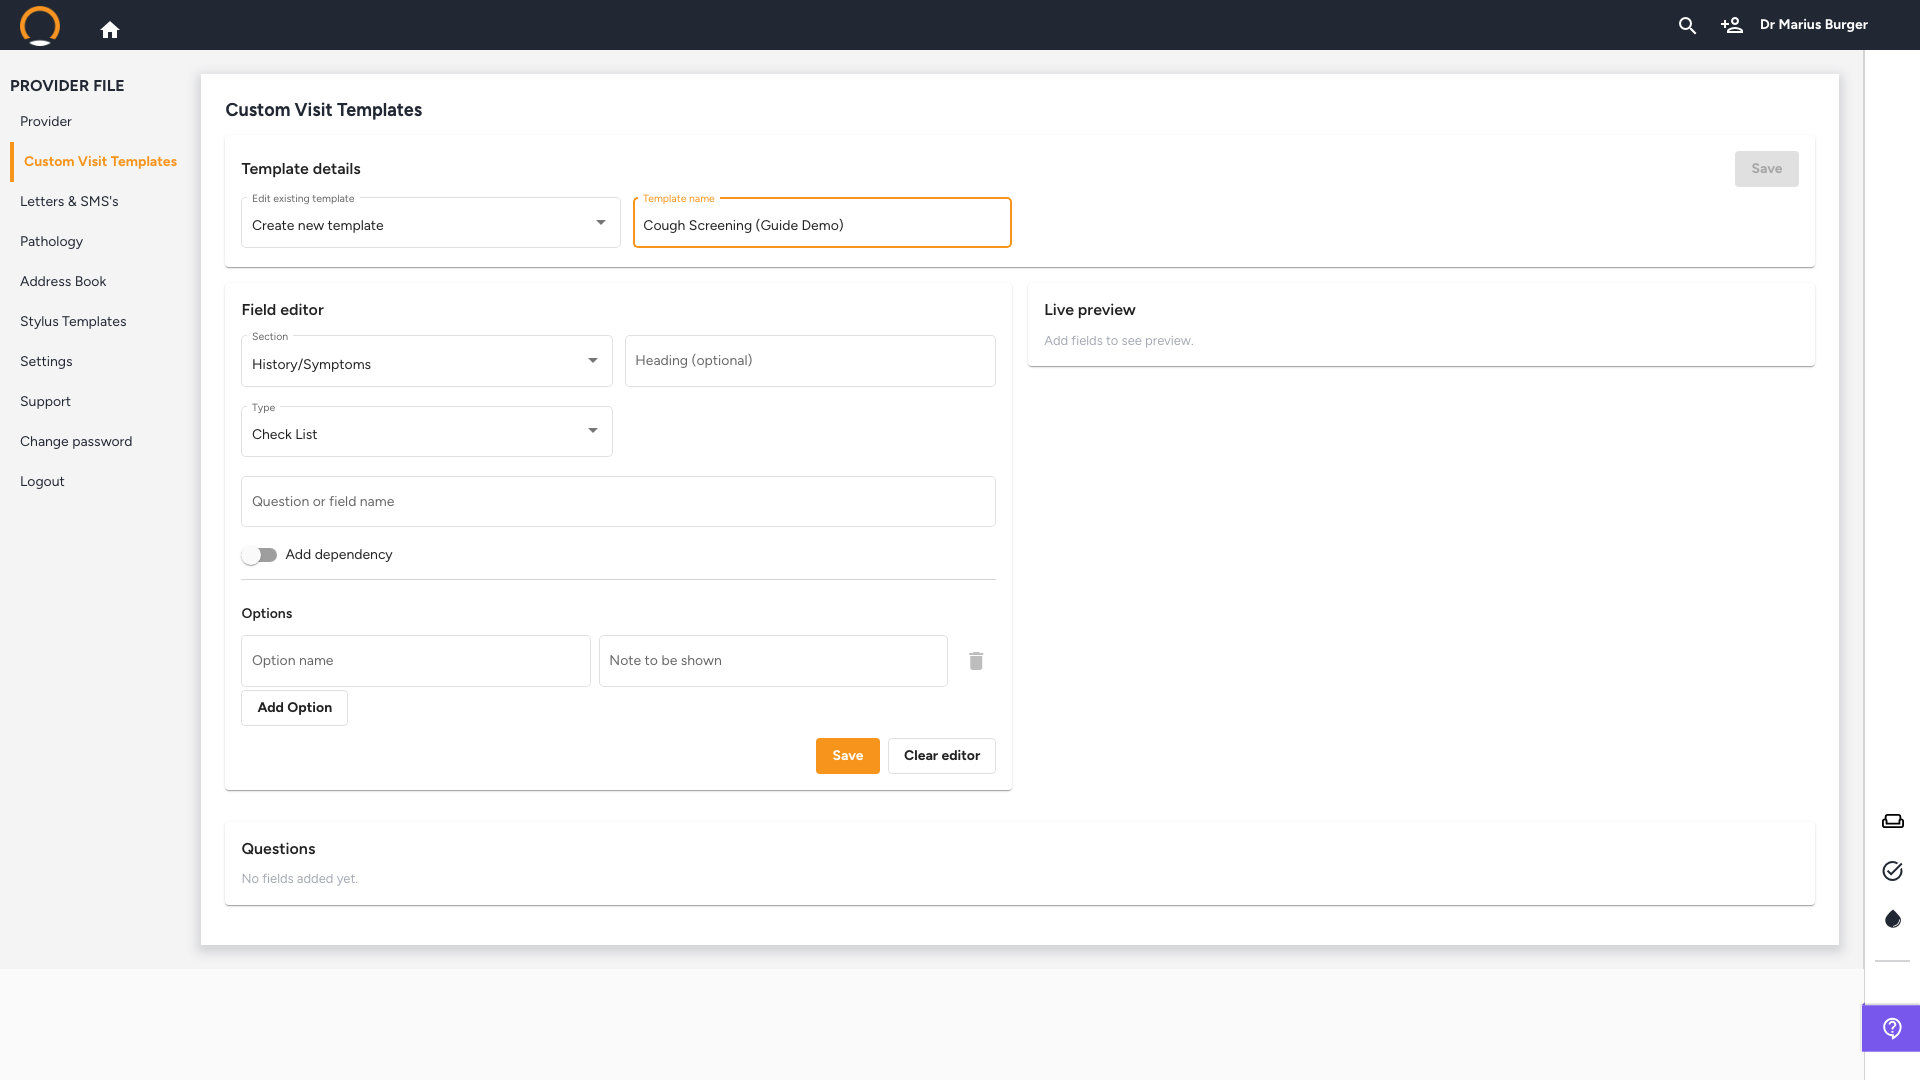
Click your provider name, then 'Custom Visit Templates' in the left menu. It opens with 'Create new template' already selected. Type a name in the Template name field, this is the exact name you'll click on later, during a real consultation, to apply the template.
3. Build and save your first field
Location: Field editor
Choose a Section: 'History/Symptoms', 'Screening', or 'Examination', then a field Type. For a Check List, type the Question or field name, then add each Option name and click 'Add Option' for more.
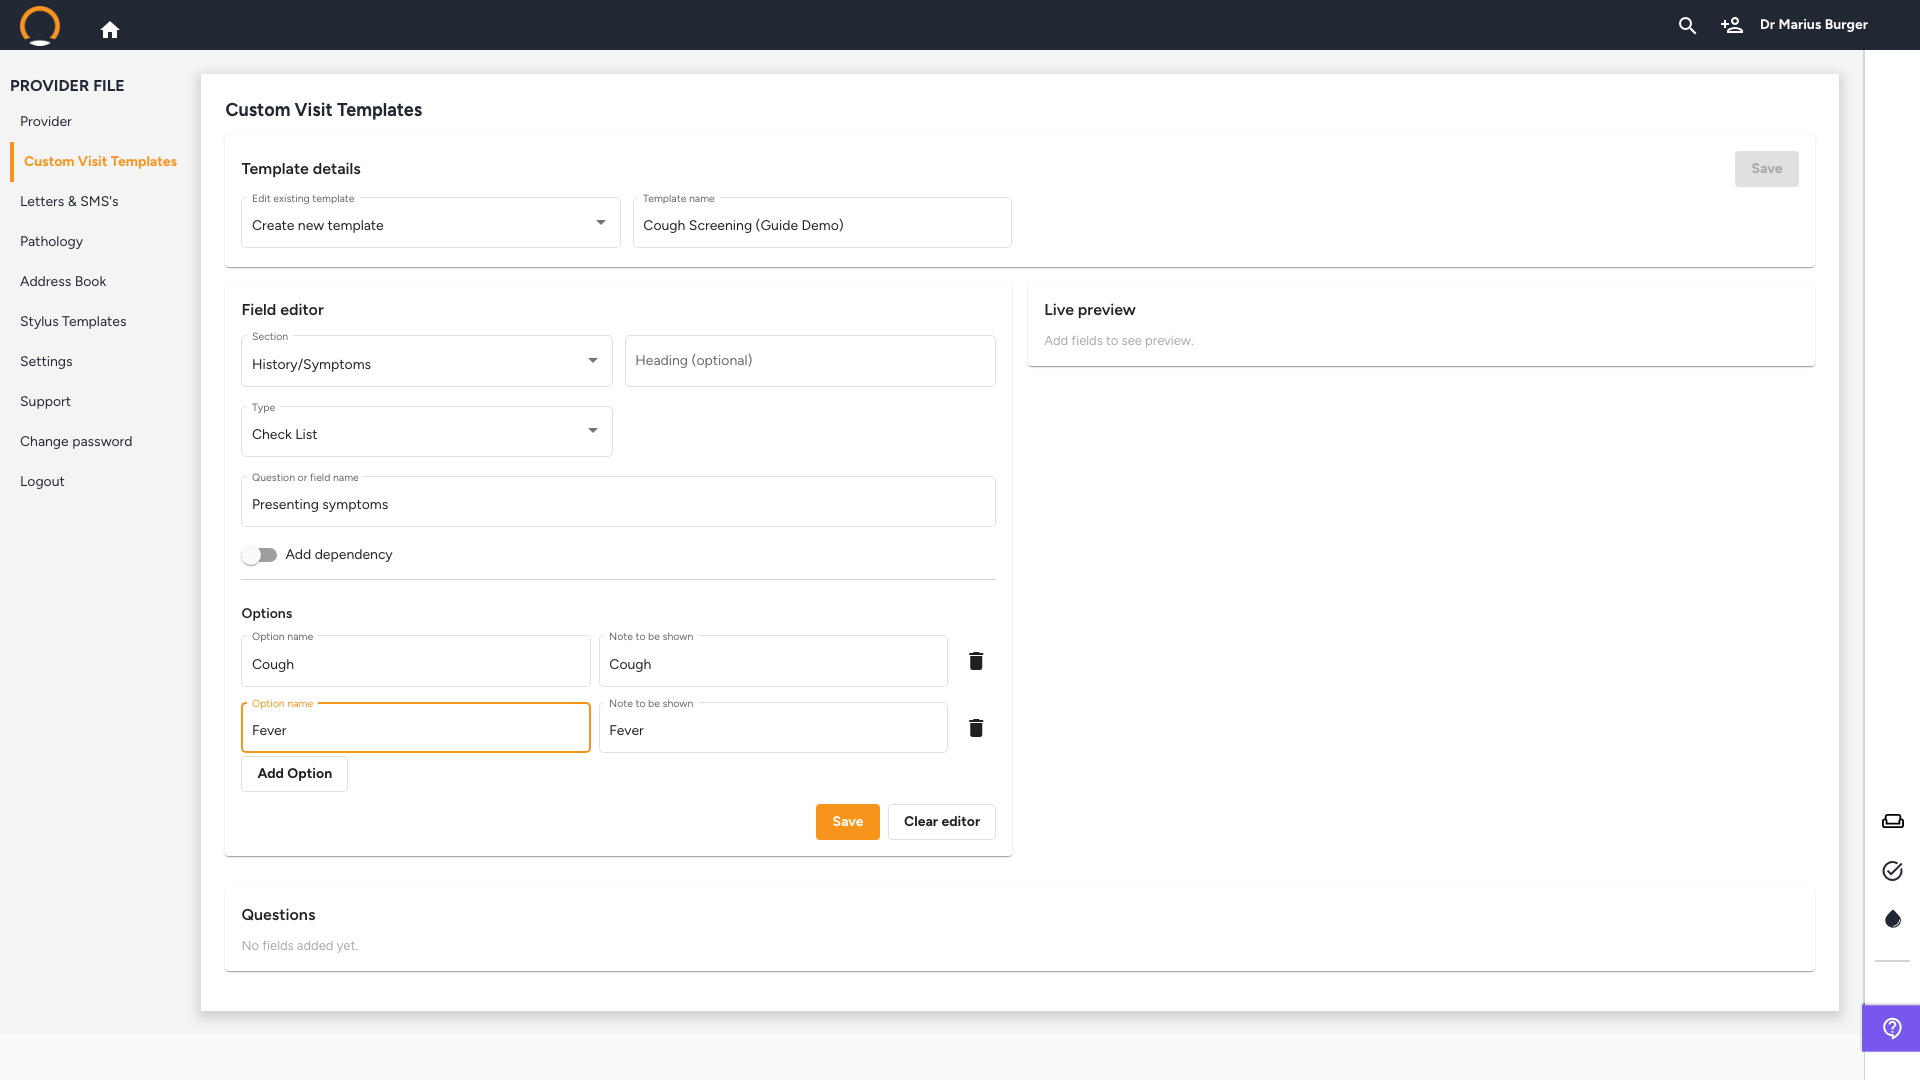
Always fill in 'Note to be shown' for every option, it defaults to match the Option name, but leaving it blank has caused incomplete or incorrect data on the patient timeline in the past. Healthbridge's team confirmed this validation is now enforced, but it's worth checking rather than assuming.
Click the 'Save' button under Options (not the orange Save top-right yet, that saves the whole template). The field moves into the Questions list below, and the Live preview panel updates immediately.
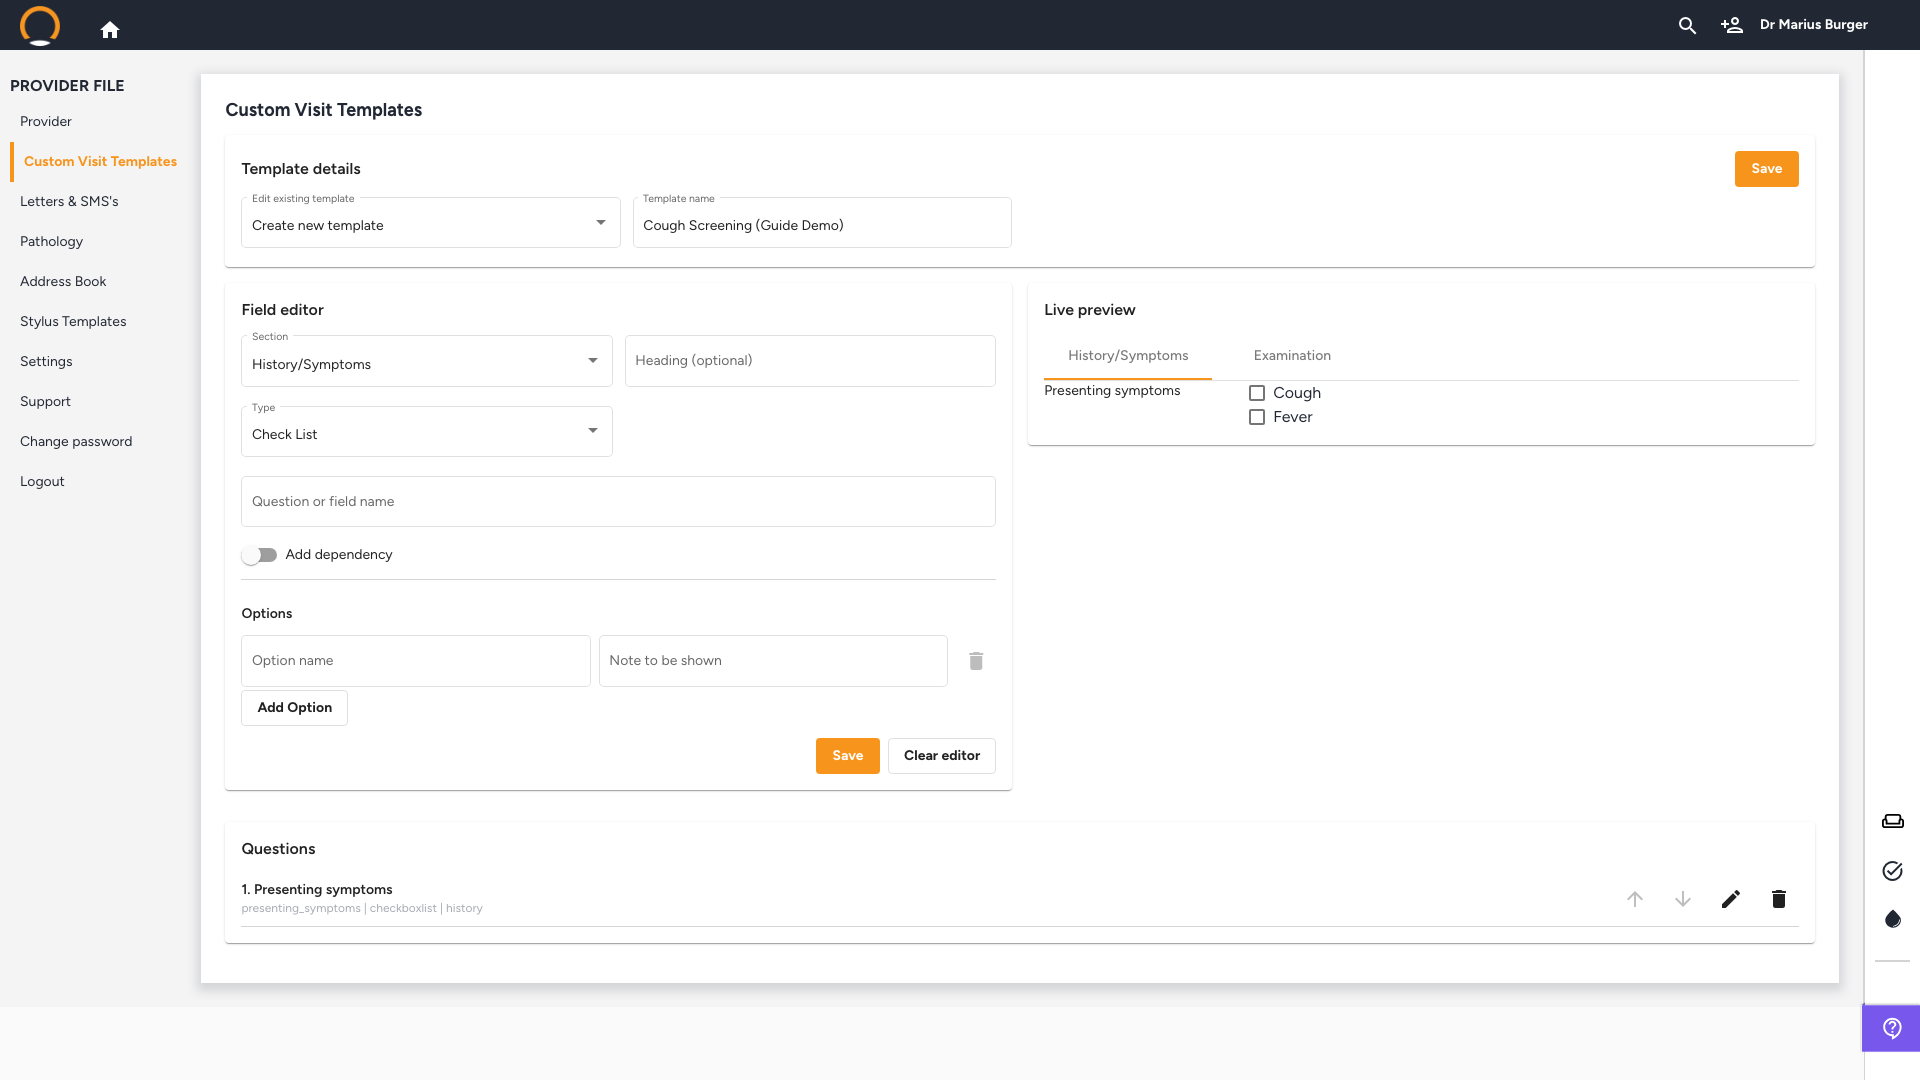
You should see: the field appear under Questions with its internal field code (e.g. presenting_symptoms | checkboxlist | history), and the orange template-level Save button in the top-right becomes clickable for the first time.
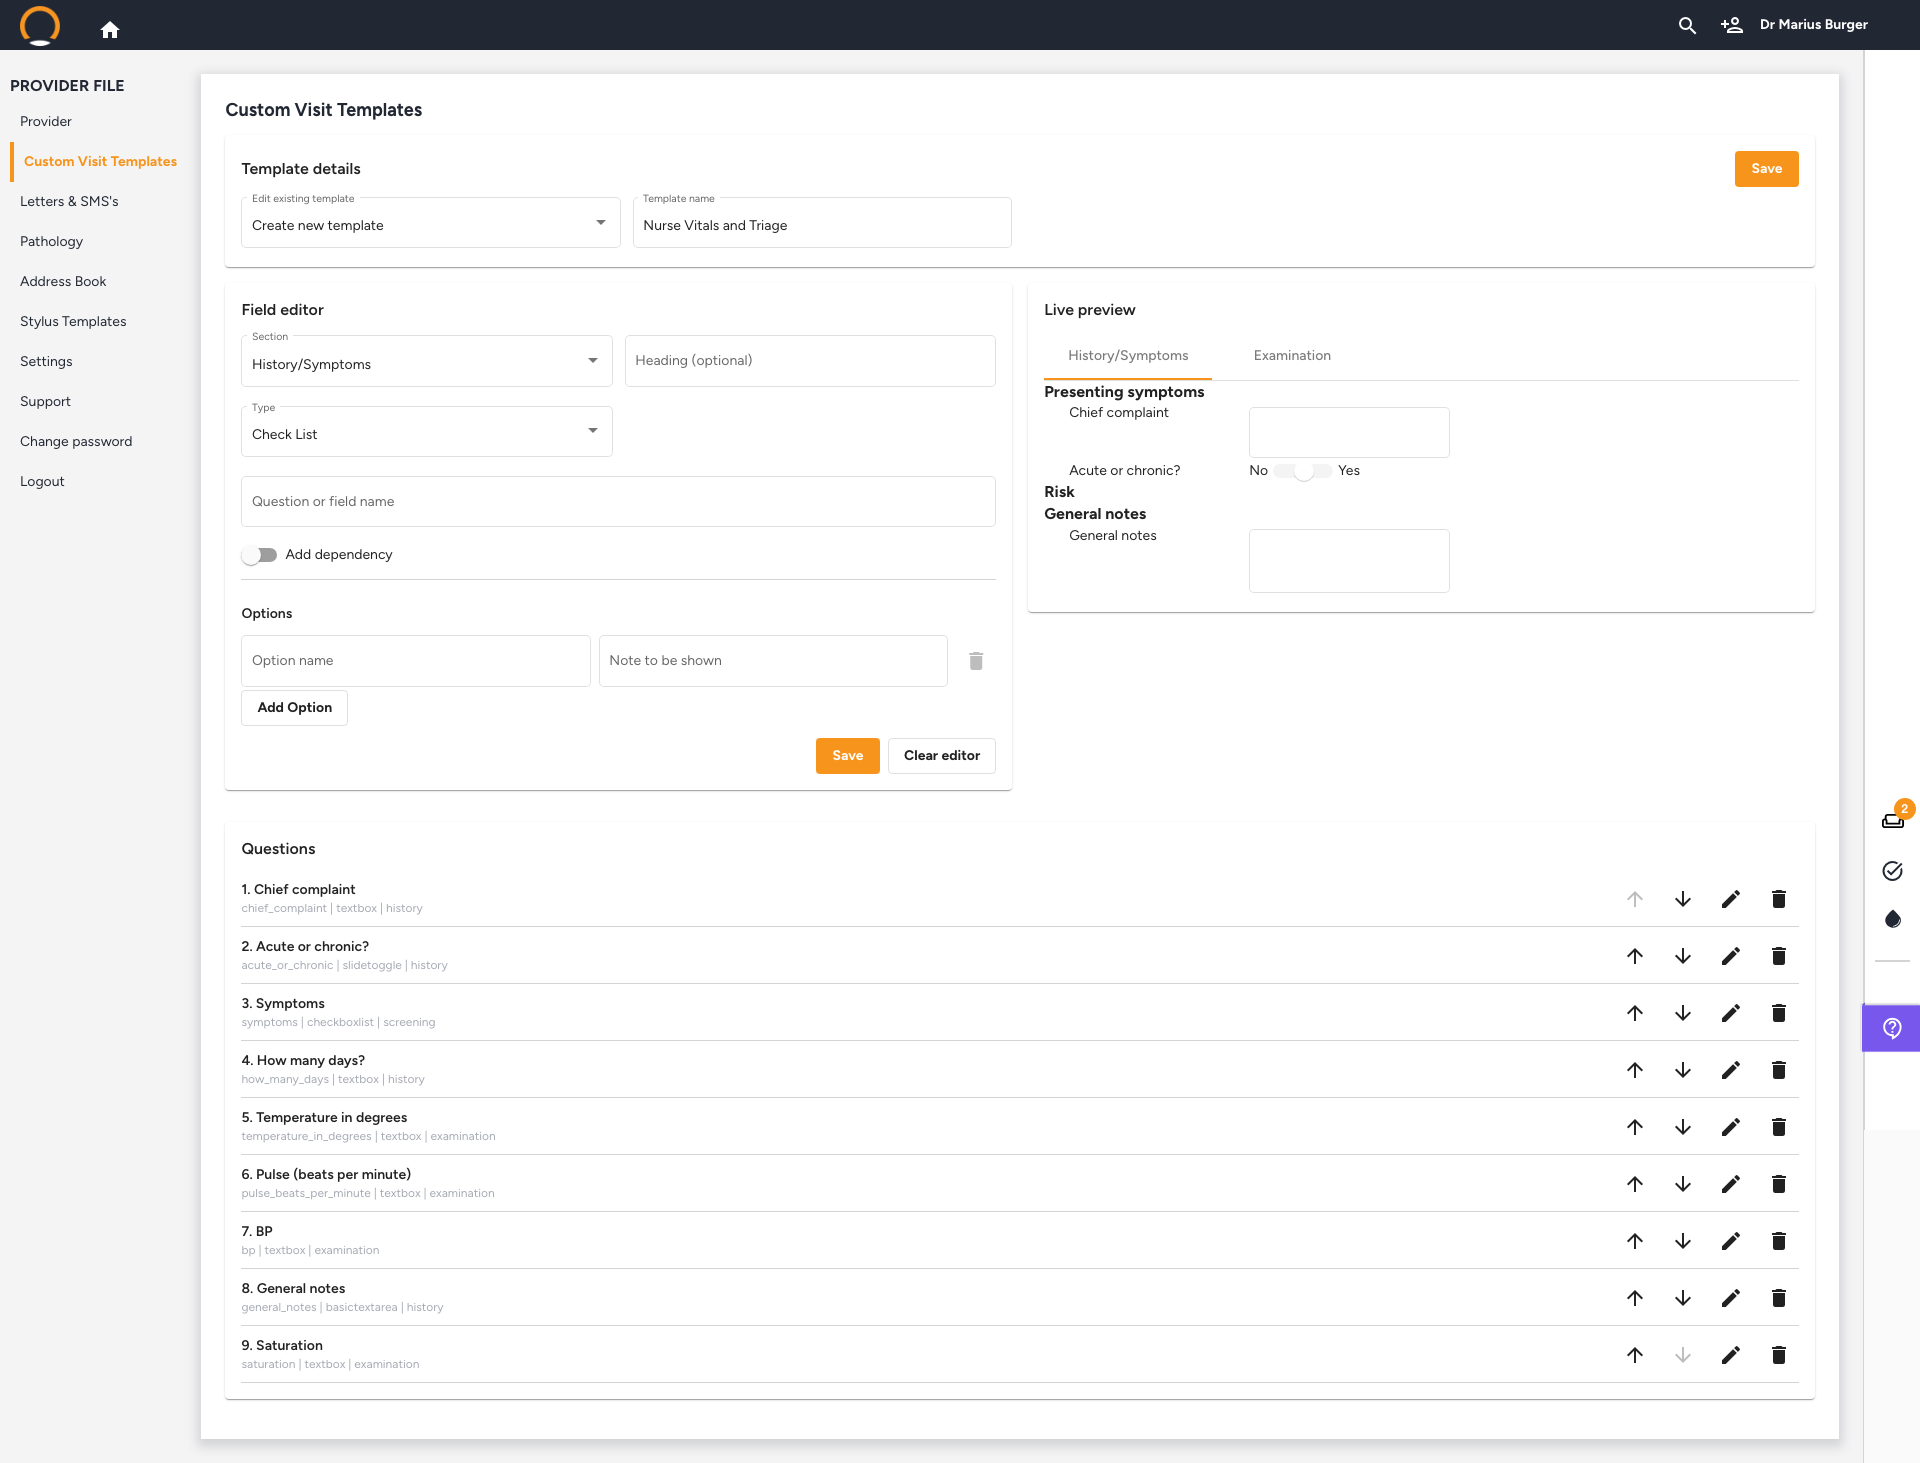
Every saved field in the Questions list has up/down arrows to reorder it, handy if Healthbridge's team builds a starting template for your practice and you just want to move a field, rather than rebuild the whole thing from scratch.
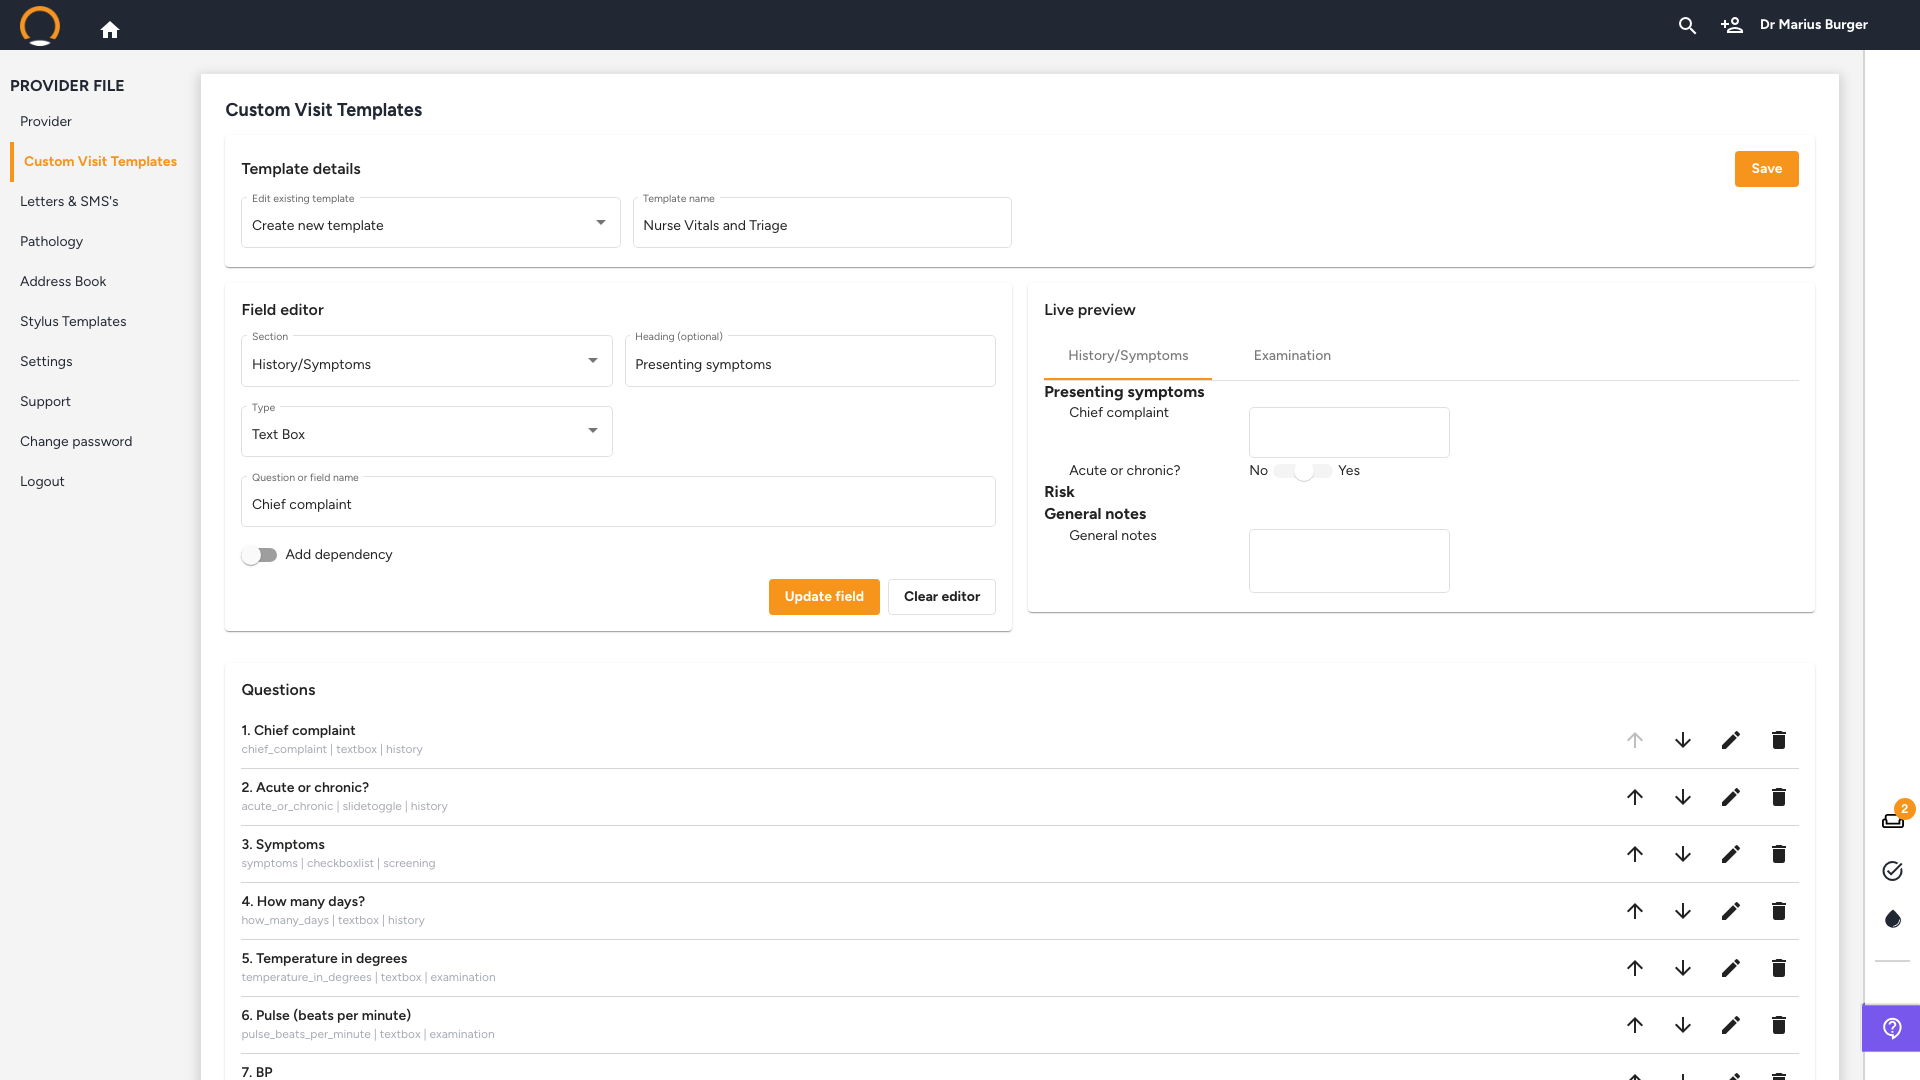
The edit (pencil) icon reopens a field in the Field editor with everything pre-filled, so you can change its type, wording, or options, the 'Save' button changes to 'Update field' while you're editing an existing one.
4. Make a field conditional with a dependency
Location: Field editor › Add dependency
Start a second field, for example a Number field named "How many days of coughing?" — then toggle 'Add dependency' on. Two new fields appear: Dependency (which earlier field this depends on) and Dependency value (which of that field's options has to be selected to trigger this one).
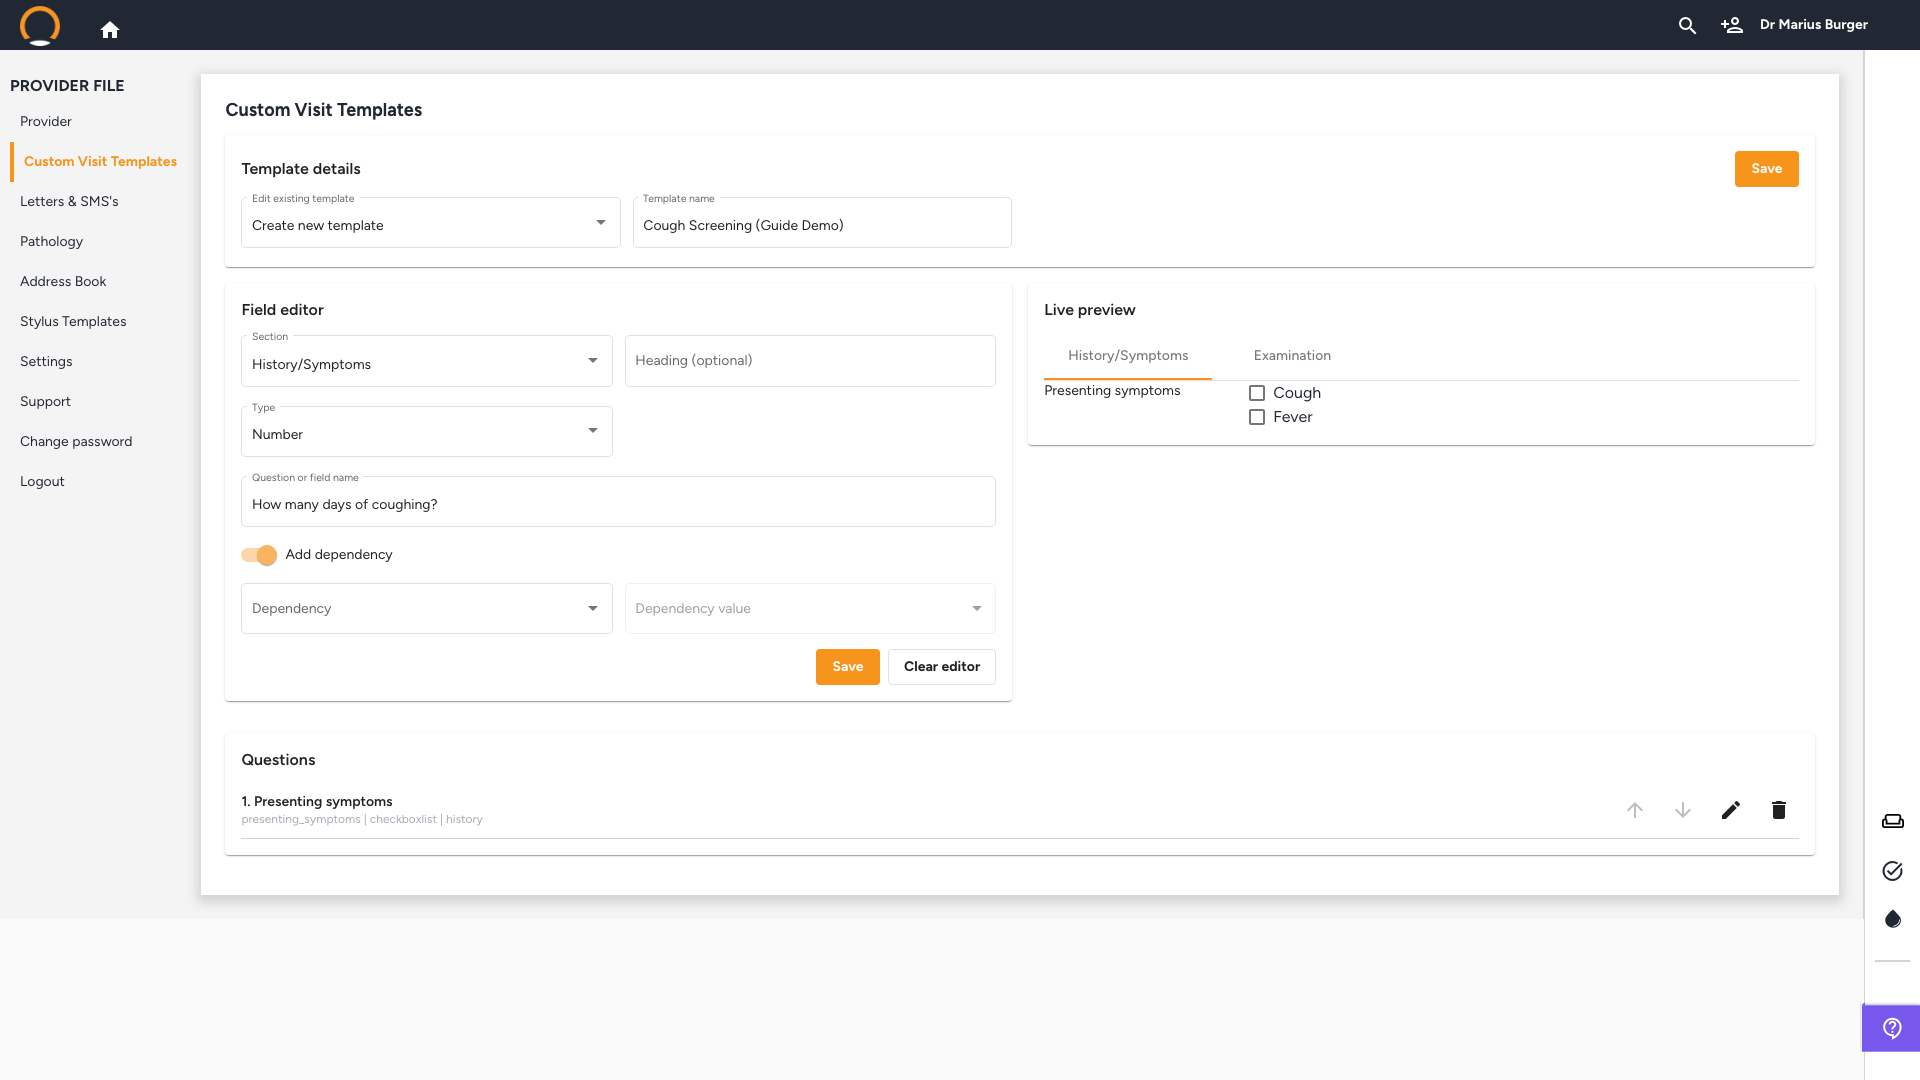
Set Dependency to the earlier field (shown with its options in brackets, e.g. "Presenting symptoms (Cough / Fever)") and Dependency value to the specific option that should trigger it, then click Save.
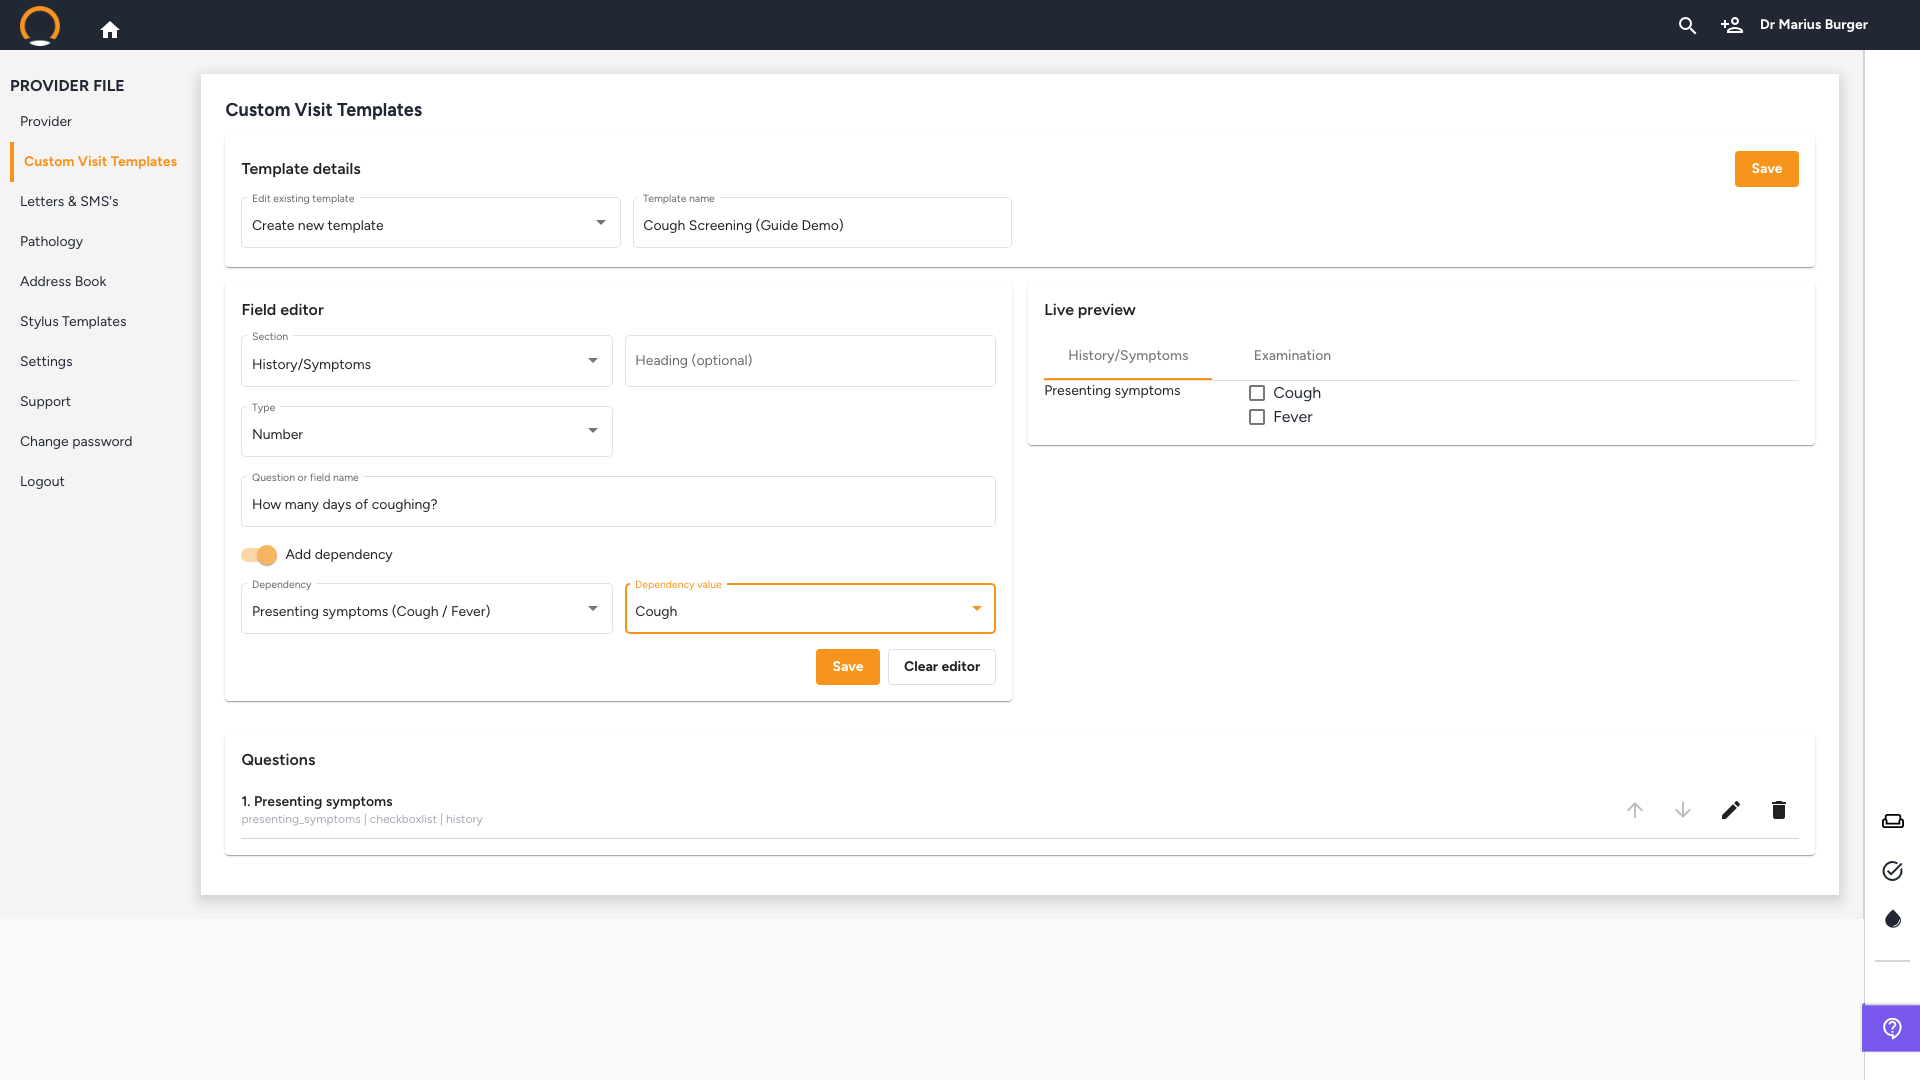
A dependent field stays hidden until its trigger is met: After saving, the Live Preview keeps showing only the first field, the dependent Number field won't render until its trigger option is actually selected. This isn't a bug: it's the same behaviour a doctor will see during a real consultation.
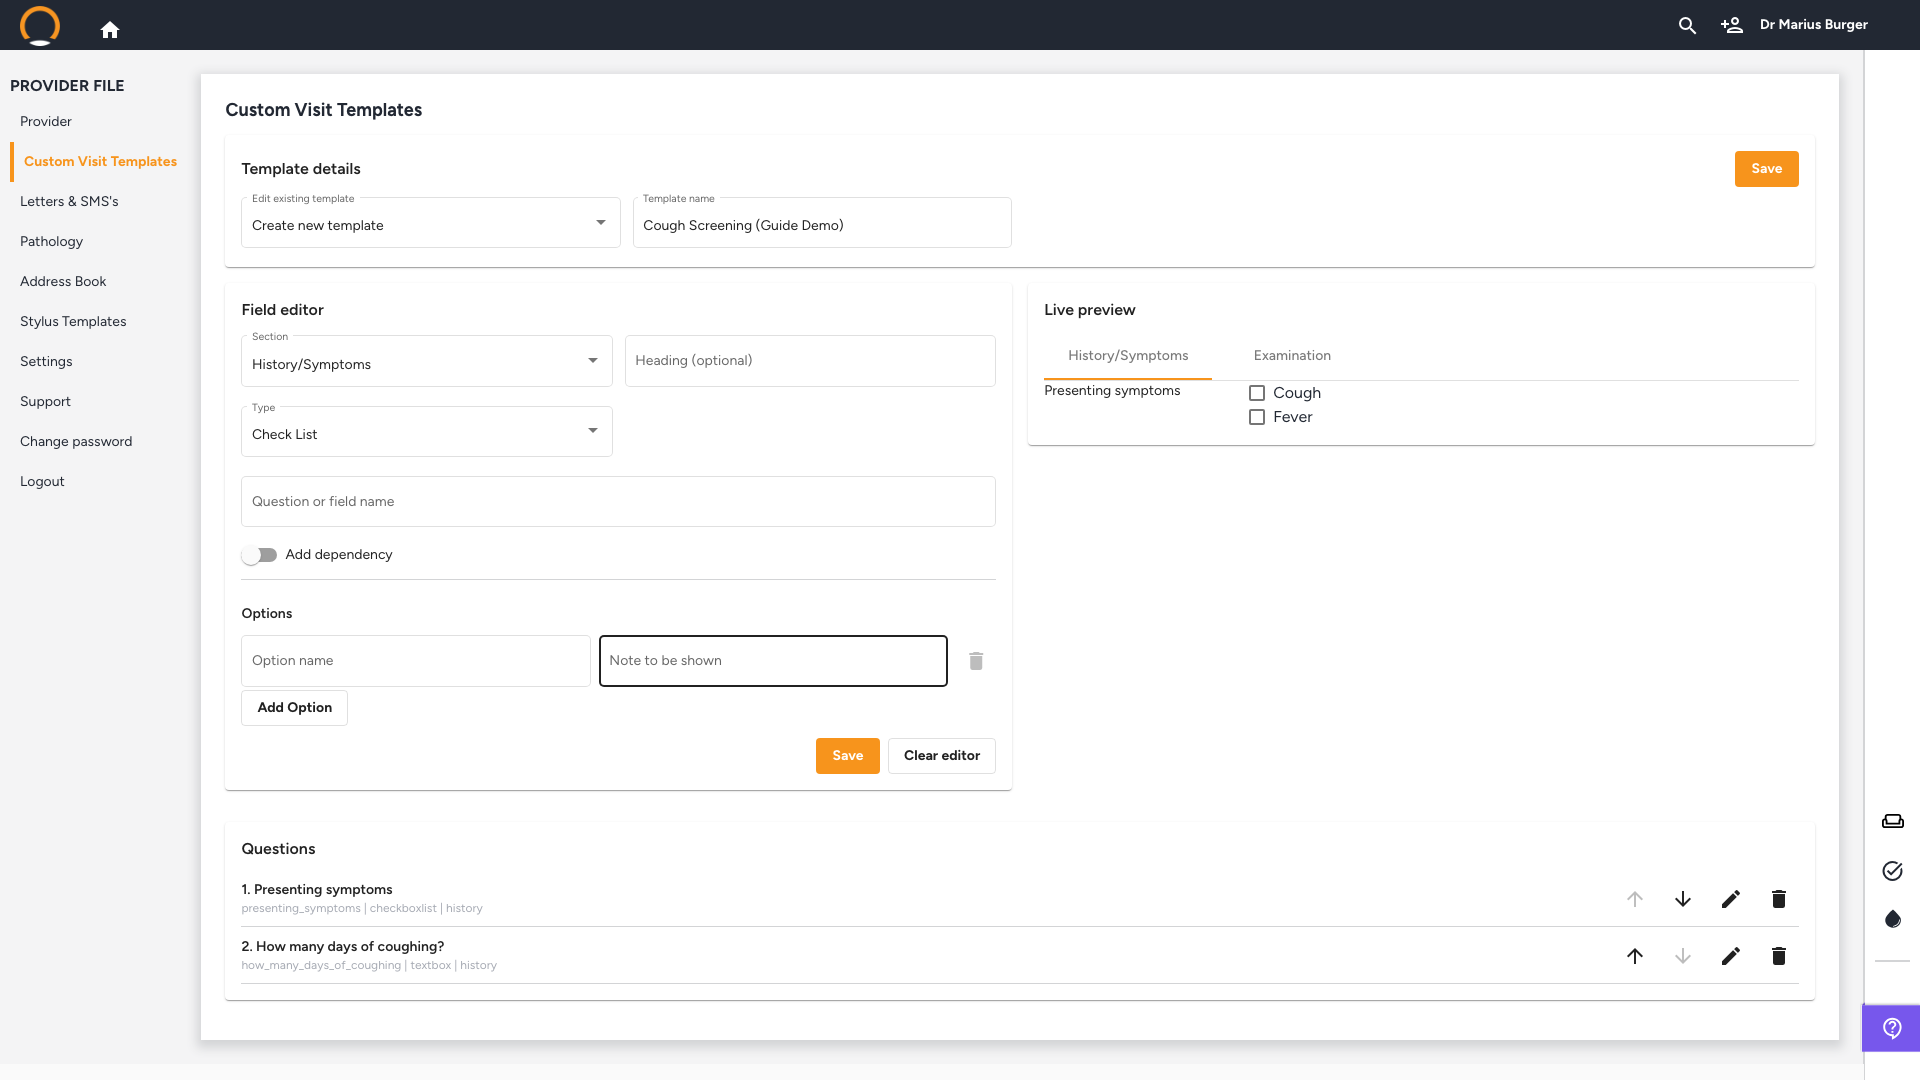
Confirmed live: ticking 'Cough' in the Live Preview immediately reveals the "How many days of coughing?" number field beneath it.
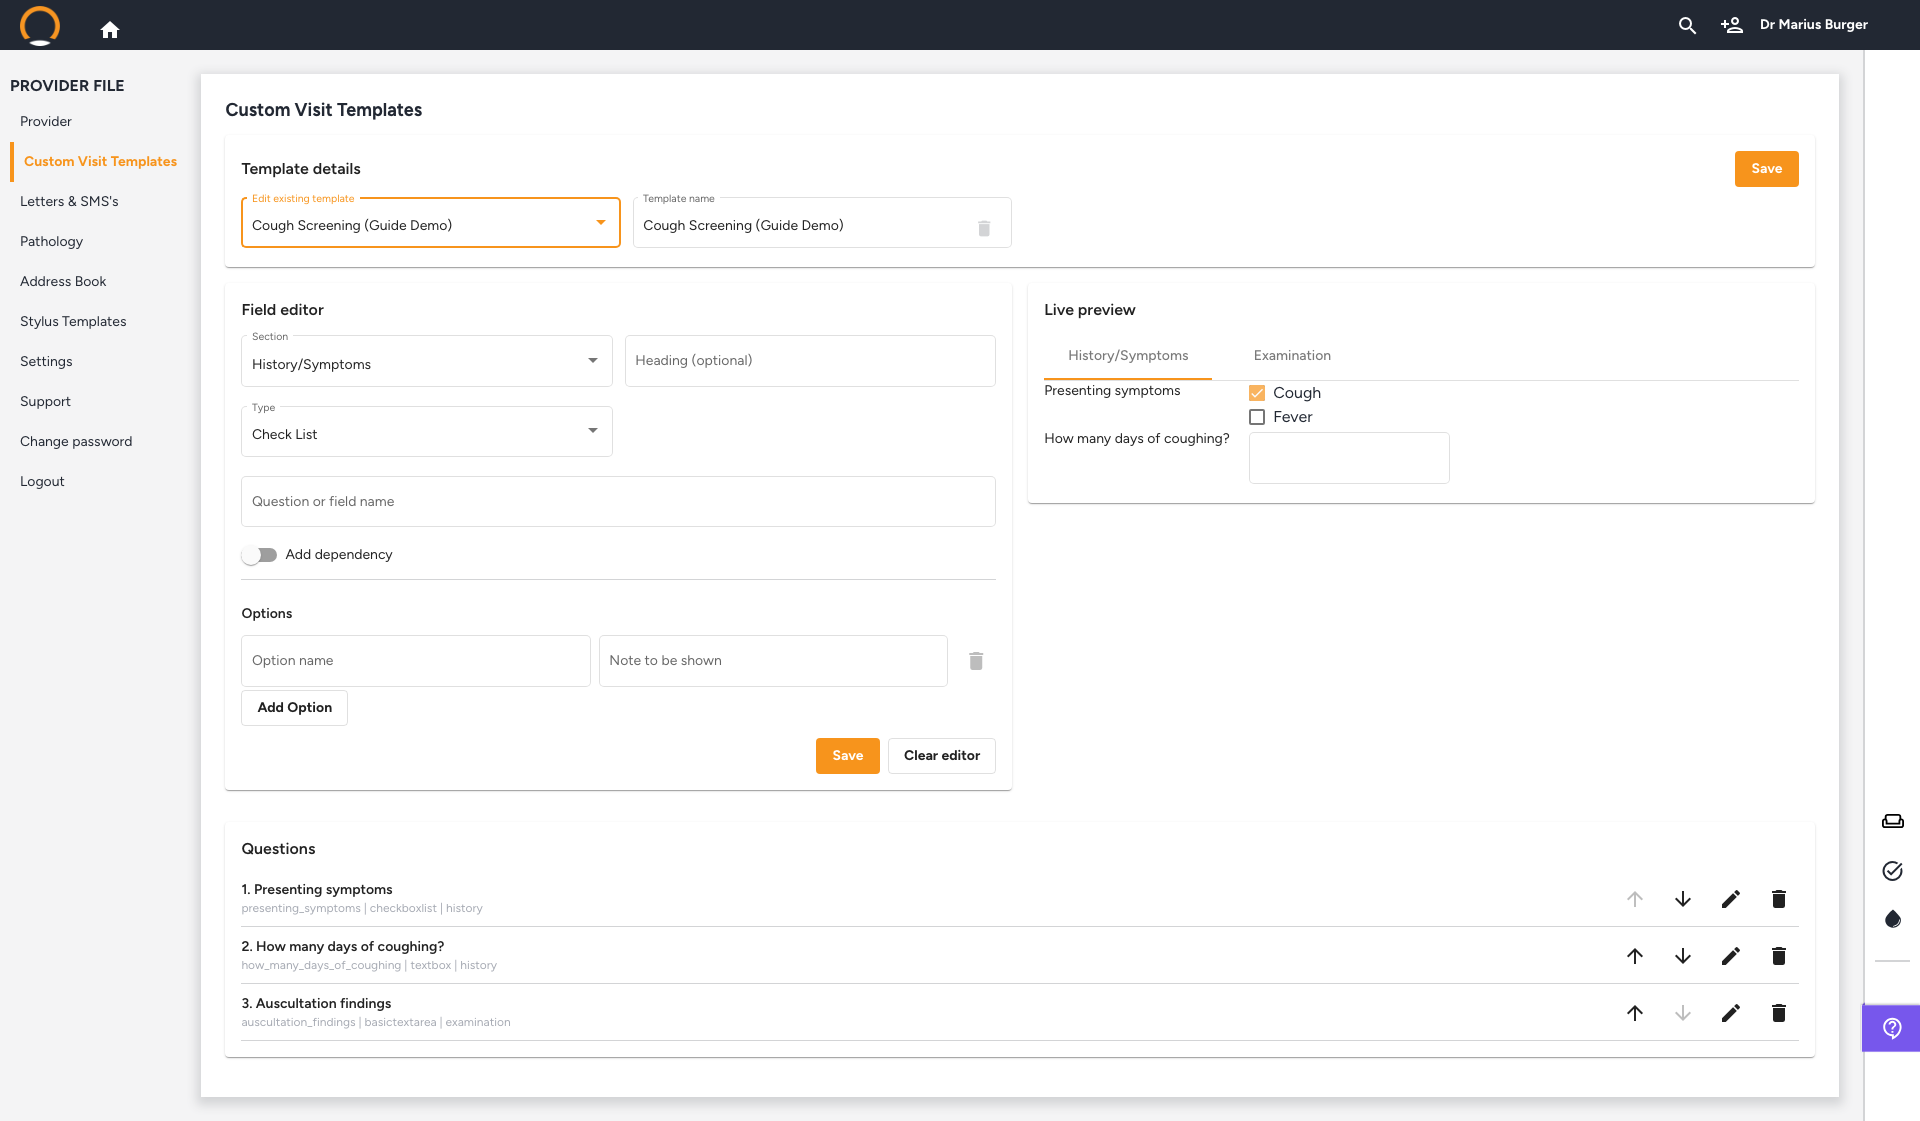
5. Group fields under a heading, and add fields to Examination
Location: Field editor › Section: Examination
Switch Section to 'Examination' and type a Heading (optional), this groups every field you add under that heading until you change it. Choose a Type (here, 'Expanding text box' for a longer note) and save.
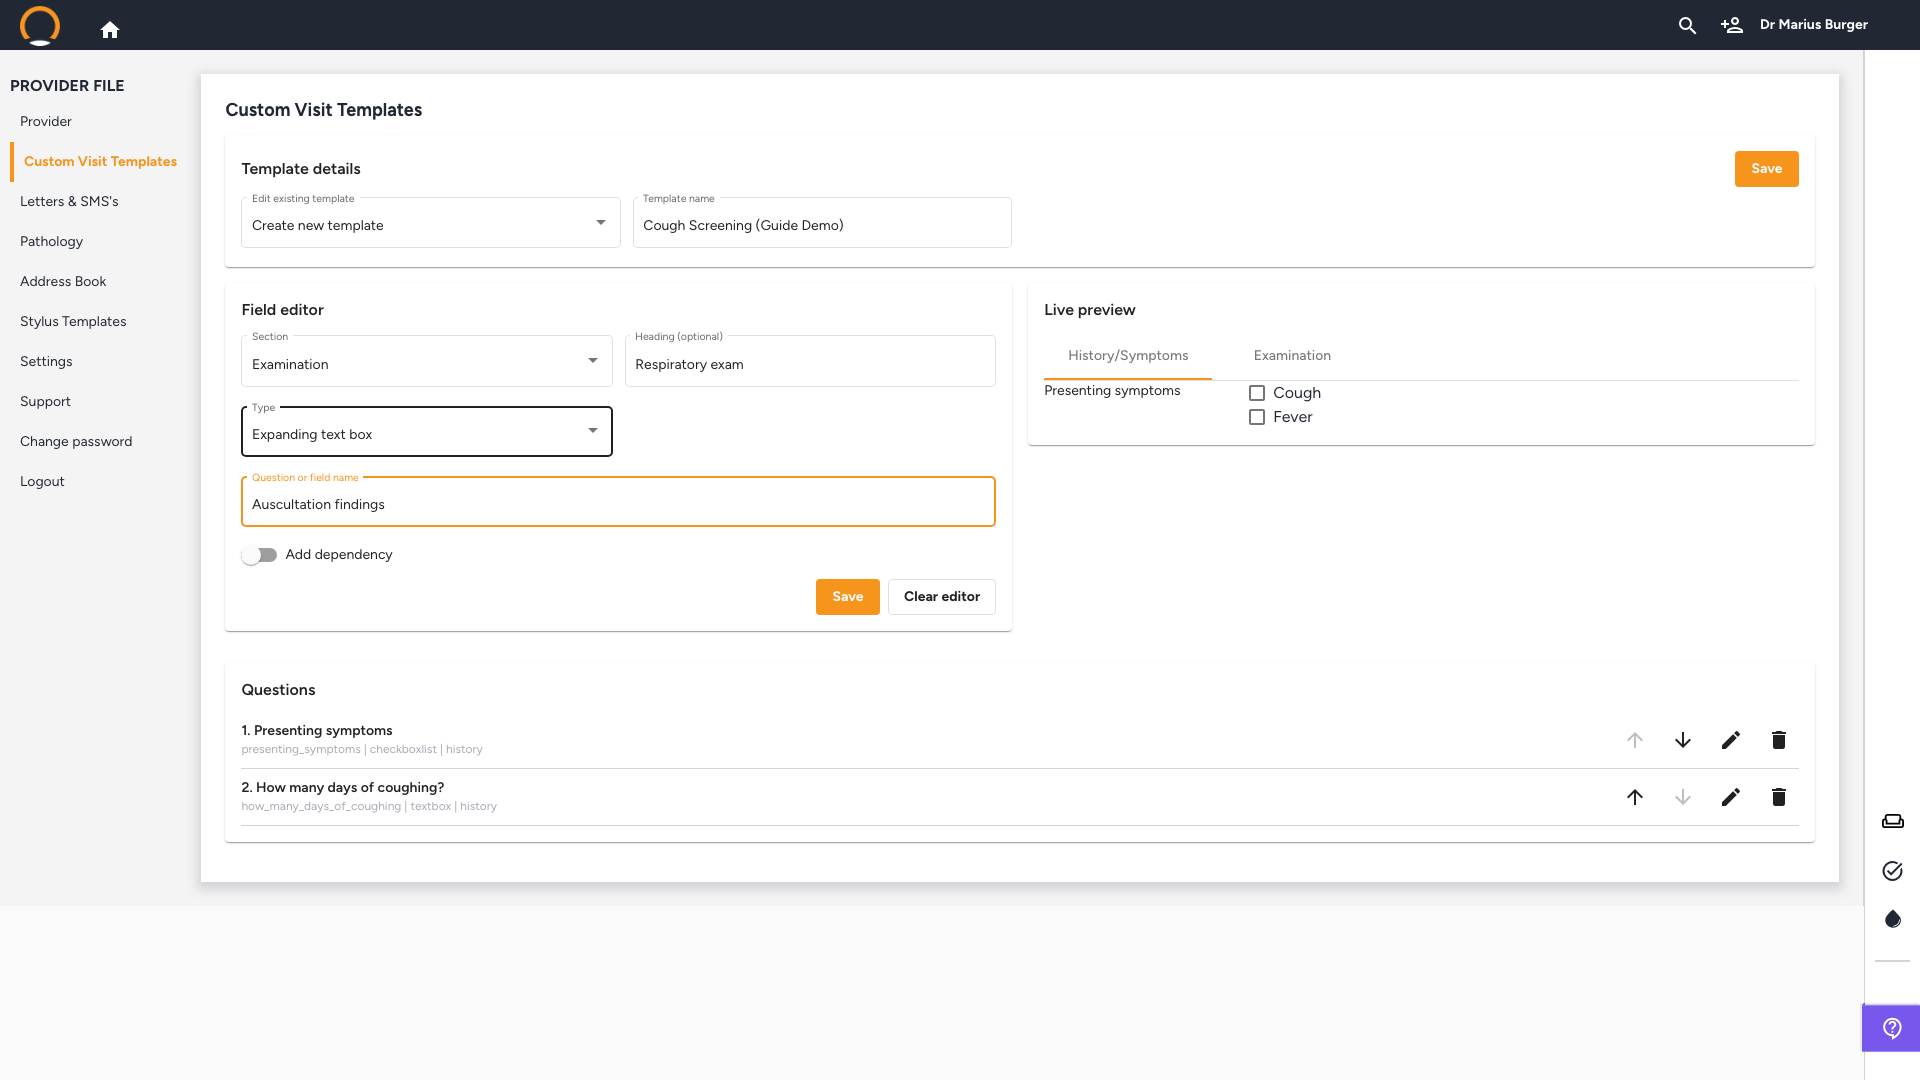
Click the 'Examination' tab inside the Live Preview panel itself to check the result, it doesn't switch there automatically.
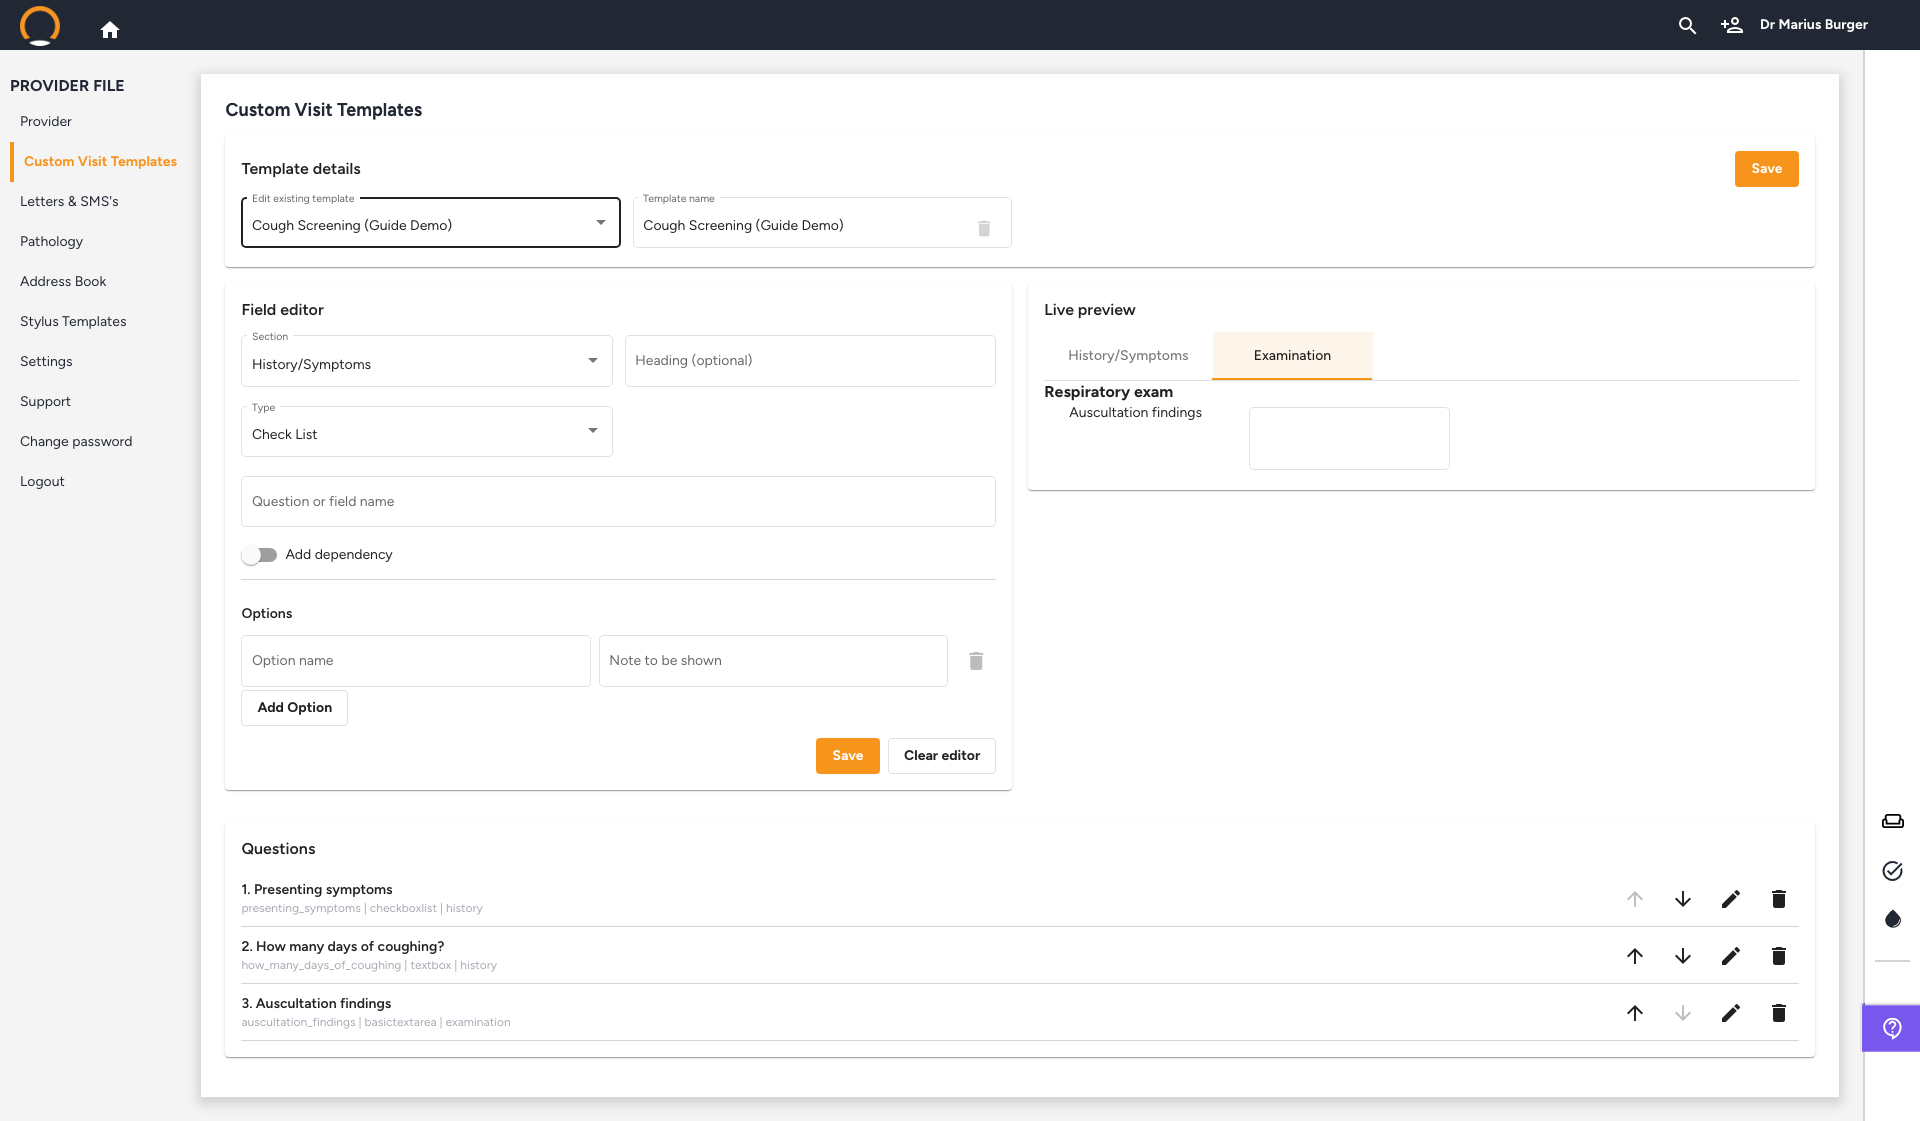
6. Choose the right field type for the data you need
Location: Field editor › Type
Six field types are available: Check List for multiple-choice options (e.g. a list of symptoms to tick), Date for a date picker, Text Box for a short single-line answer, Expanding text box for longer notes that grow as you type, Number for numeric values, and Slide Toggle for a simple two-option switch.
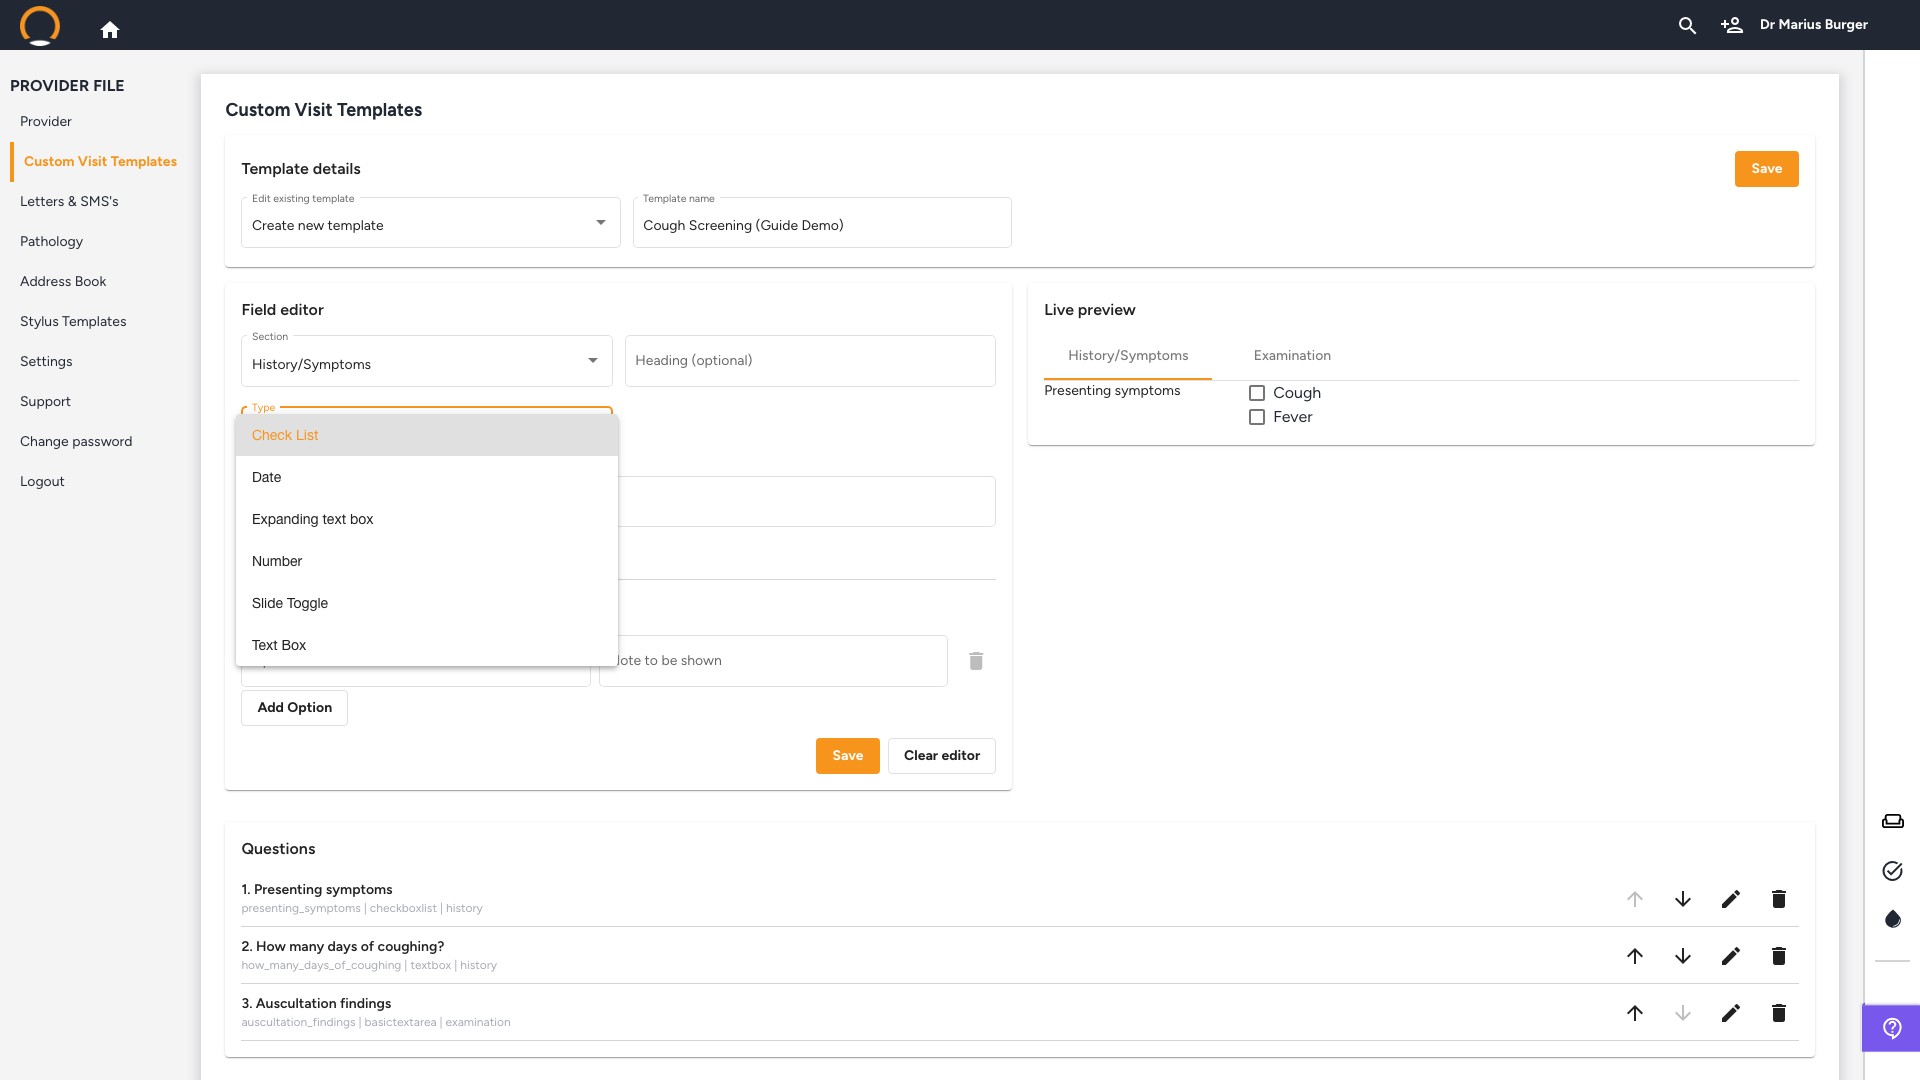
7. Save the whole template
Location: Template details › Save
Once every field is added, click the orange 'Save' button in the top-right of the Template details card. A confirmation toast appears, and the template is now available from the 'Edit existing template' dropdown for future changes.
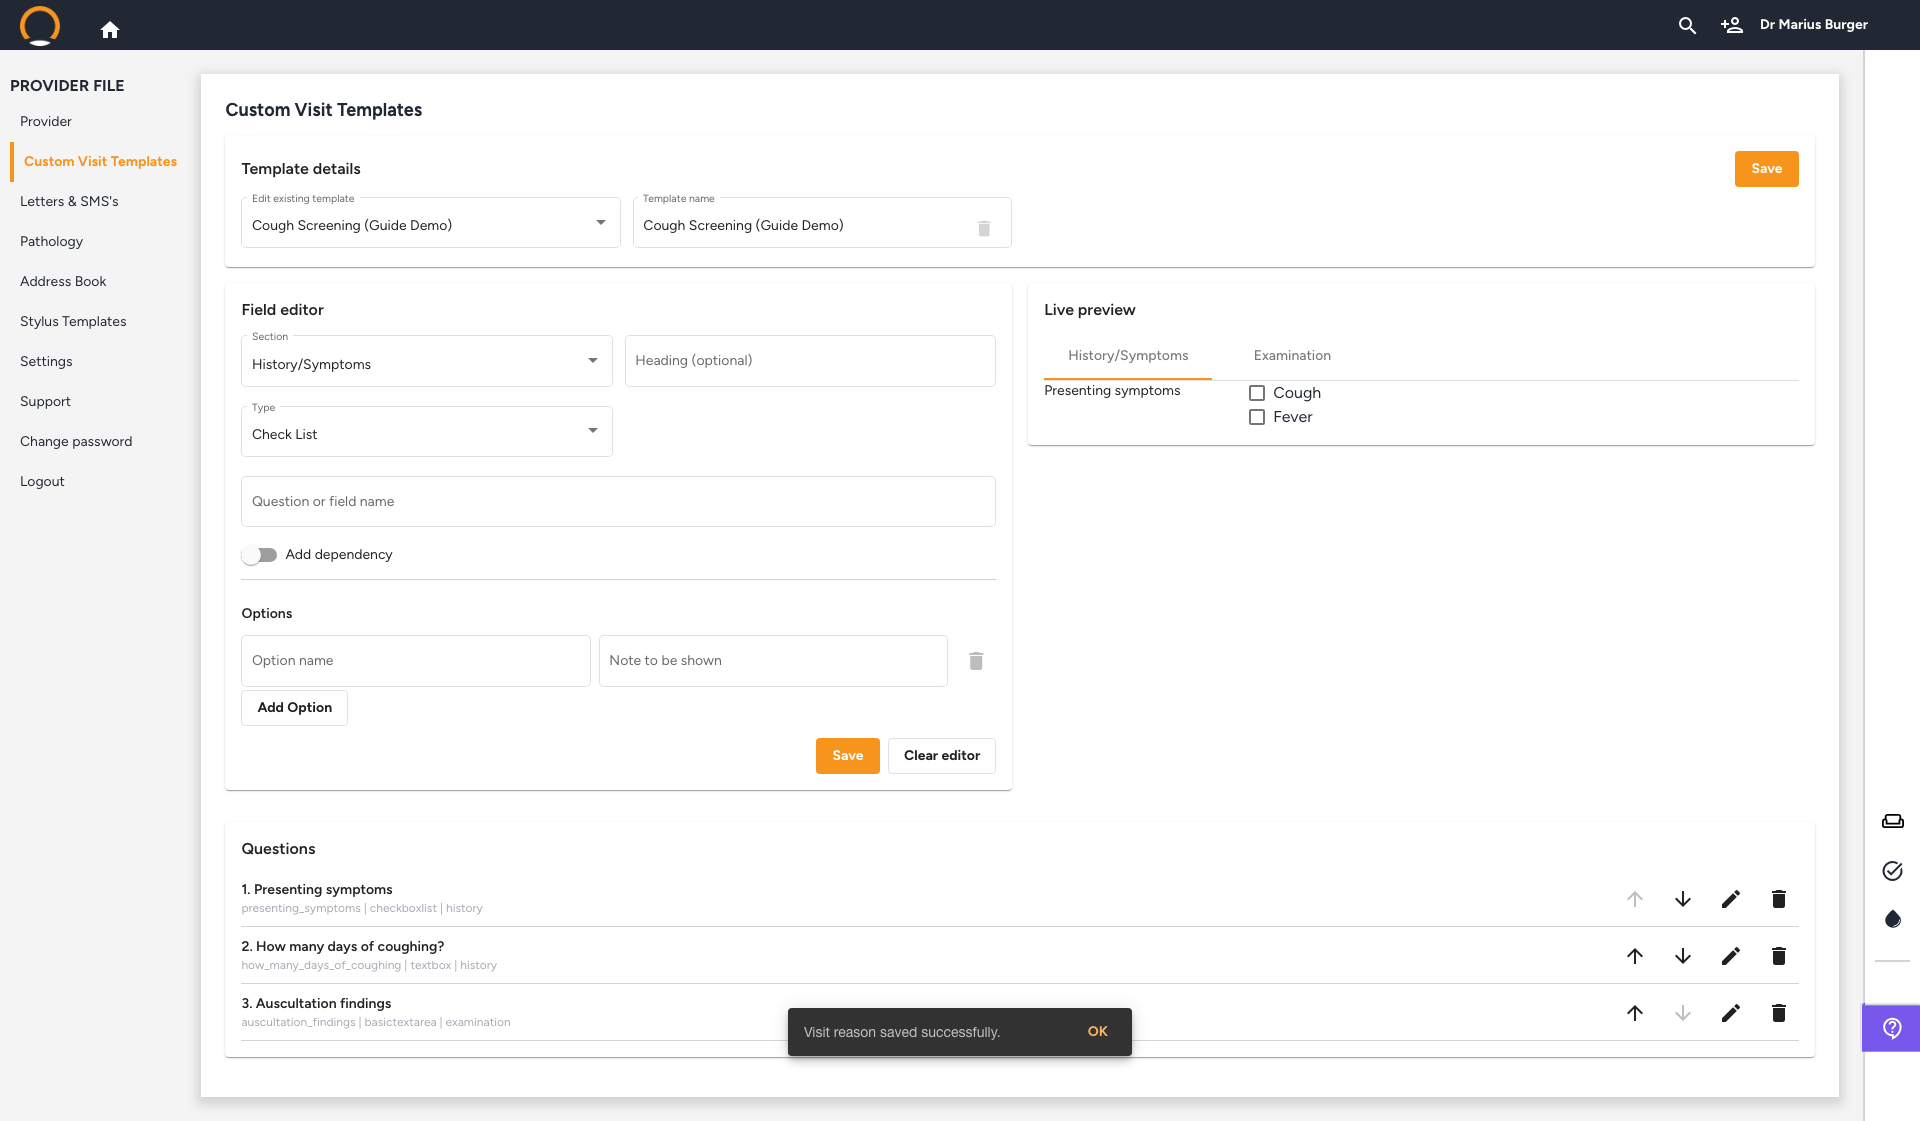
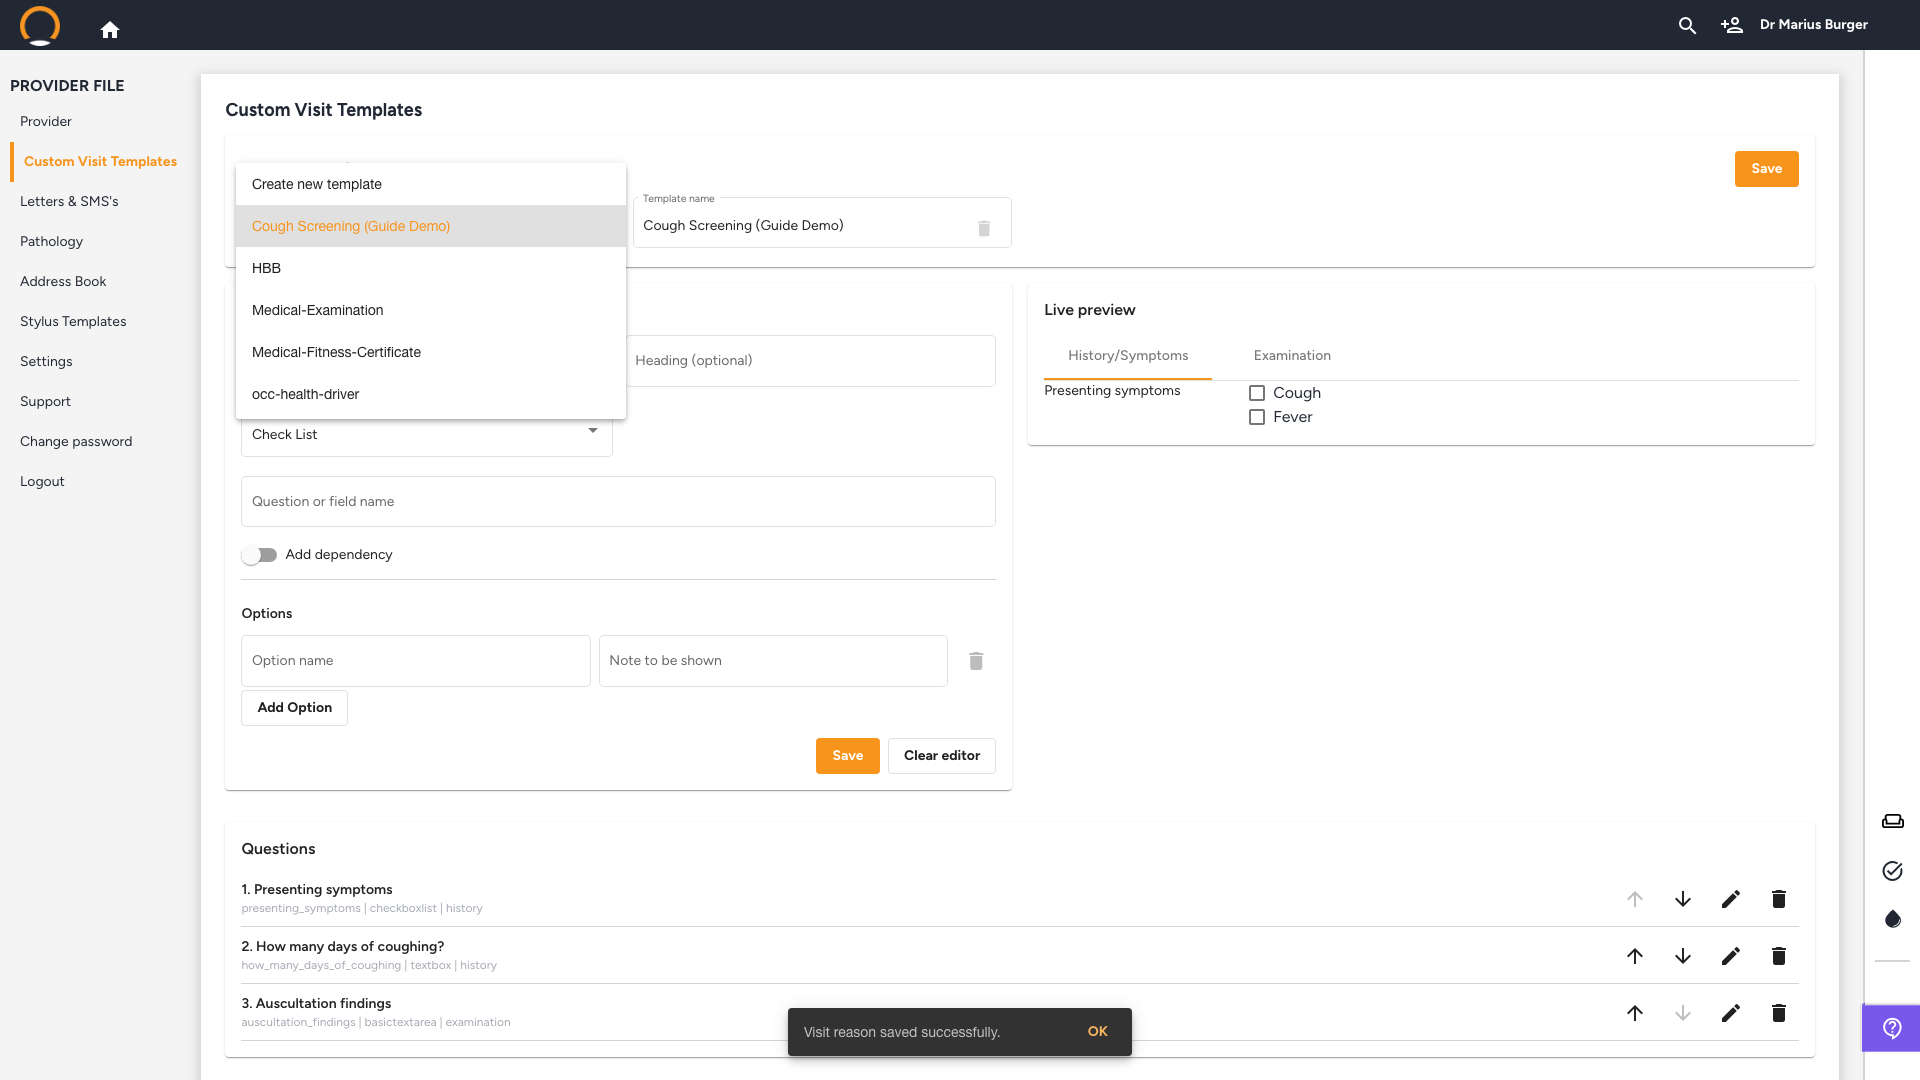
You should see: the toast text "Visit reason saved successfully", that's the system's internal name for this feature leaking through; it doesn't affect anything.
8. Apply the template during a real consultation
Location: Consultation › Symptoms tab › Custom Templates
Start a consultation and click the 'Symptoms' tab. Above 'Complaint' and 'Visit Type' is a separate 'Custom Templates' row listing every template you've built, as clickable pills. Click your template's name to apply it.
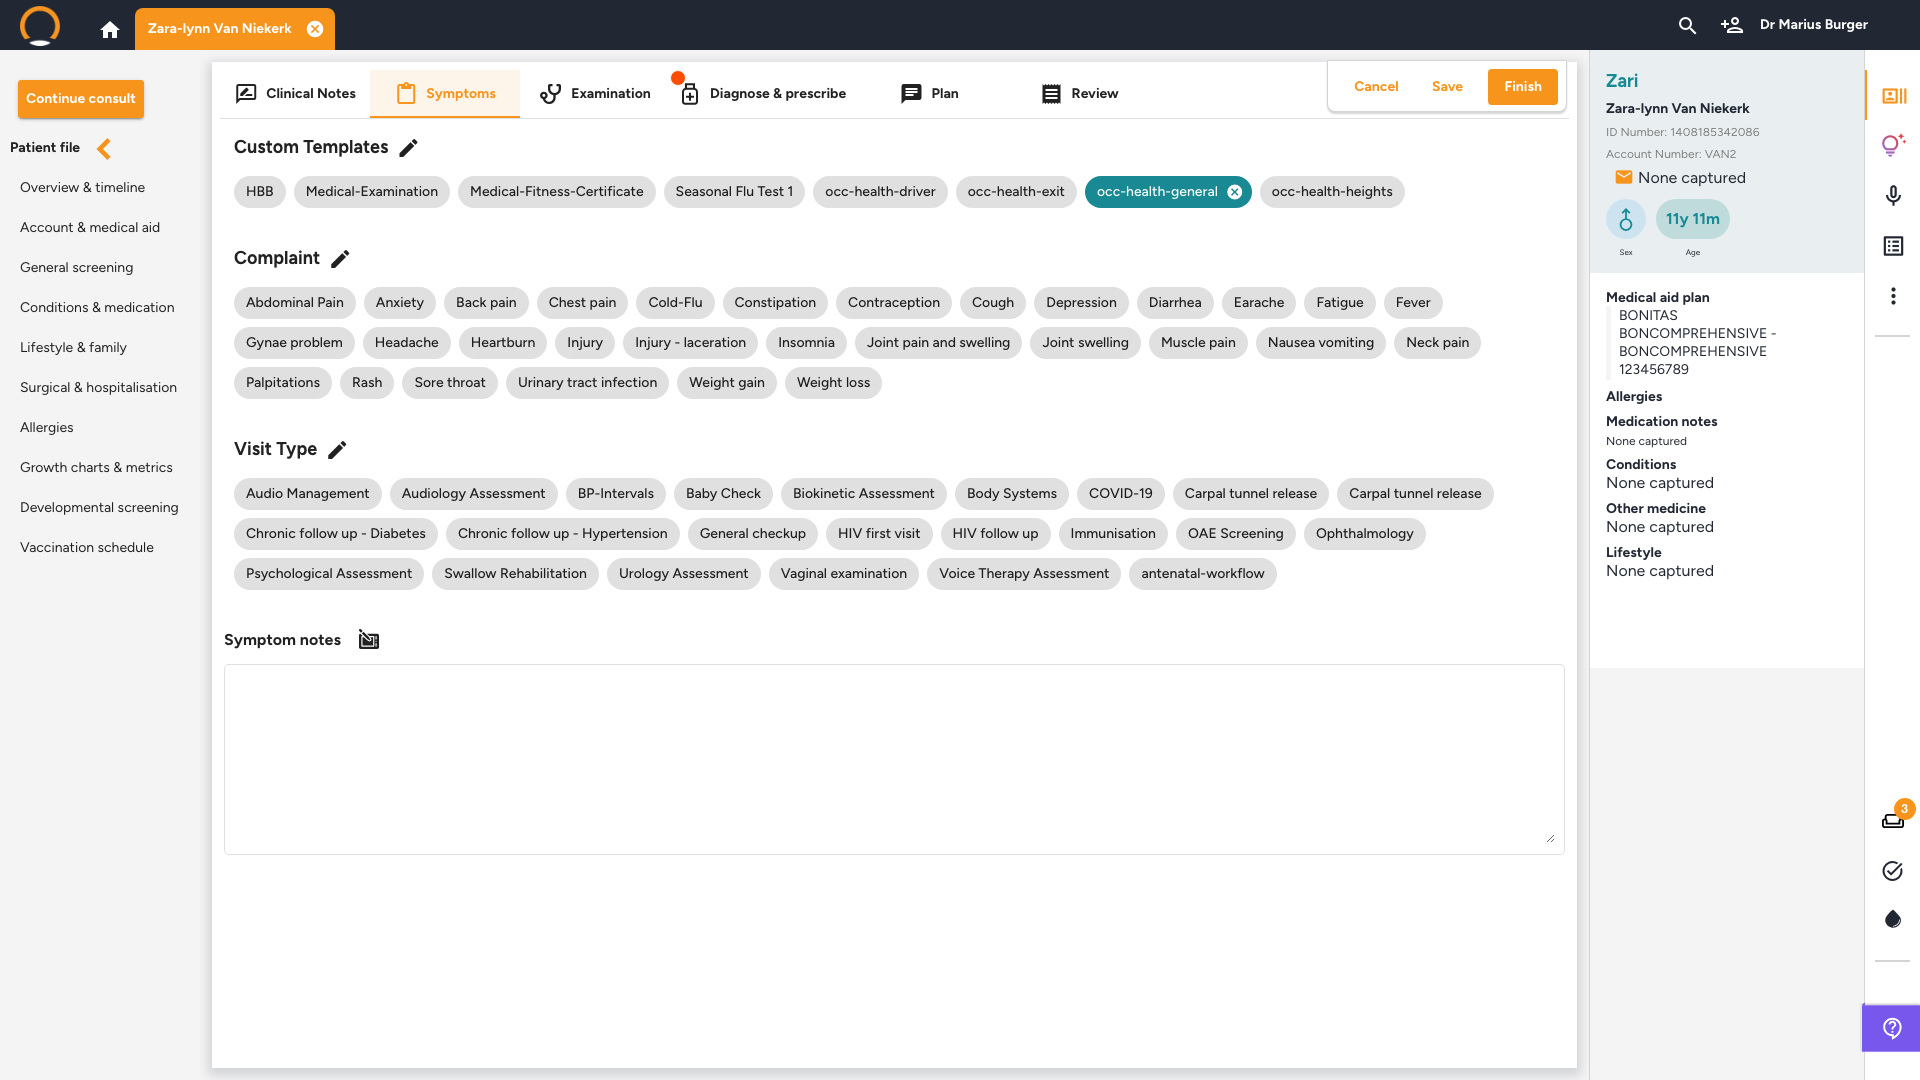
You should see: any fields you assigned to History/Symptoms appear directly on the Symptoms tab, and any assigned to Examination appear under a brand-new sub-tab on the Examination tab, named after your template.
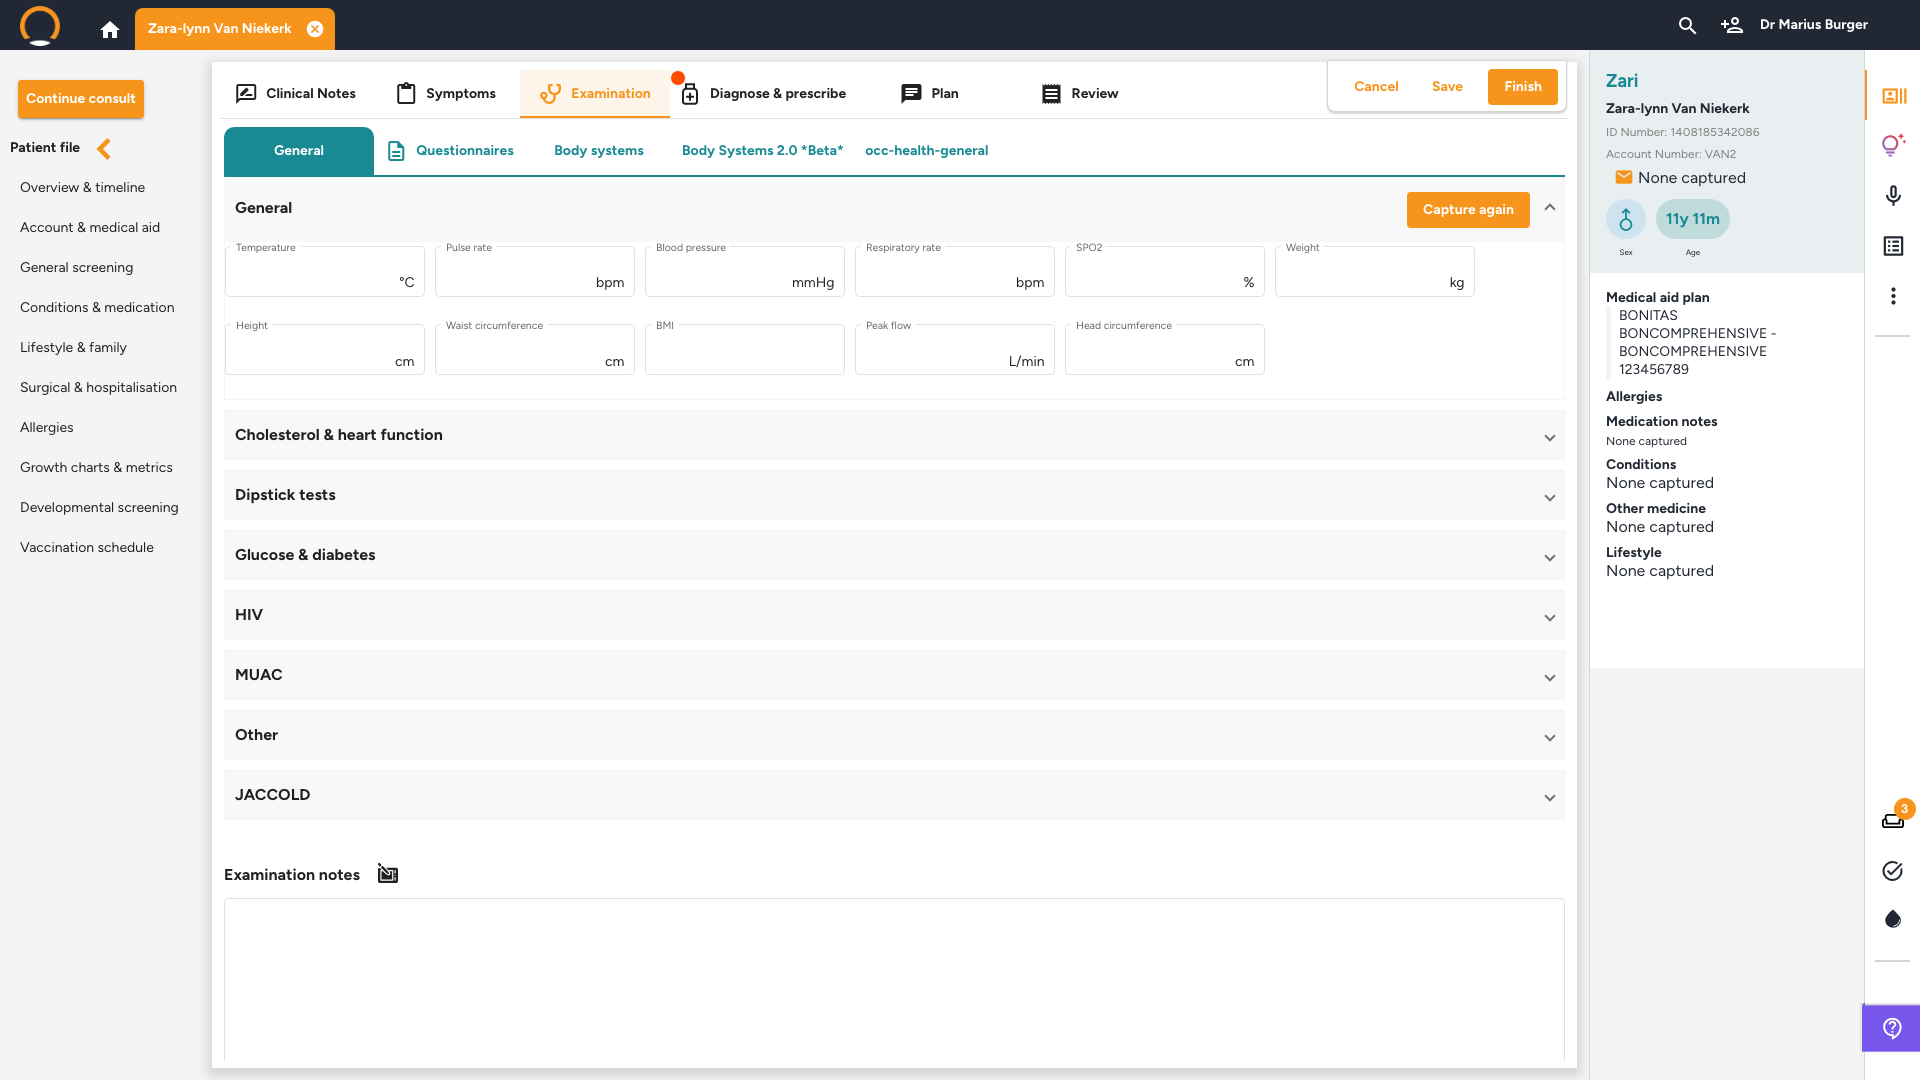
Worked examples
Two real templates, walked through directly with Healthbridge's product team and rebuilt live to confirm the result, a general-practice starting point and a specialty one.
"Nurse Vitals and Triage" for a practice that wants one consistent, minimal set of questions for every nurse-led triage, regardless of complaint:
- History/Symptoms, heading "Presenting symptoms": a Text Box field "Chief complaint".
- Same heading: a Slide Toggle "Acute or chronic?".
- Screening, heading "Risk": a Check List "Symptoms" with options Fever, Cough, Headache as demonstrated by Healthbridge's product team.
- History/Symptoms, same heading "Risk": a Number field "How many days?", with a dependency on the Symptoms checklist's Cough option.
- Examination, heading "Vitals": Number fields for "Temperature in degrees", "Pulse (beats per minute)", "BP", and "Saturation" each its own field, same heading, grouped together under a new "Vitals" area on the Examination tab.
- History/Symptoms, heading "General notes": an Expanding text box for anything that doesn't fit the structured fields above.
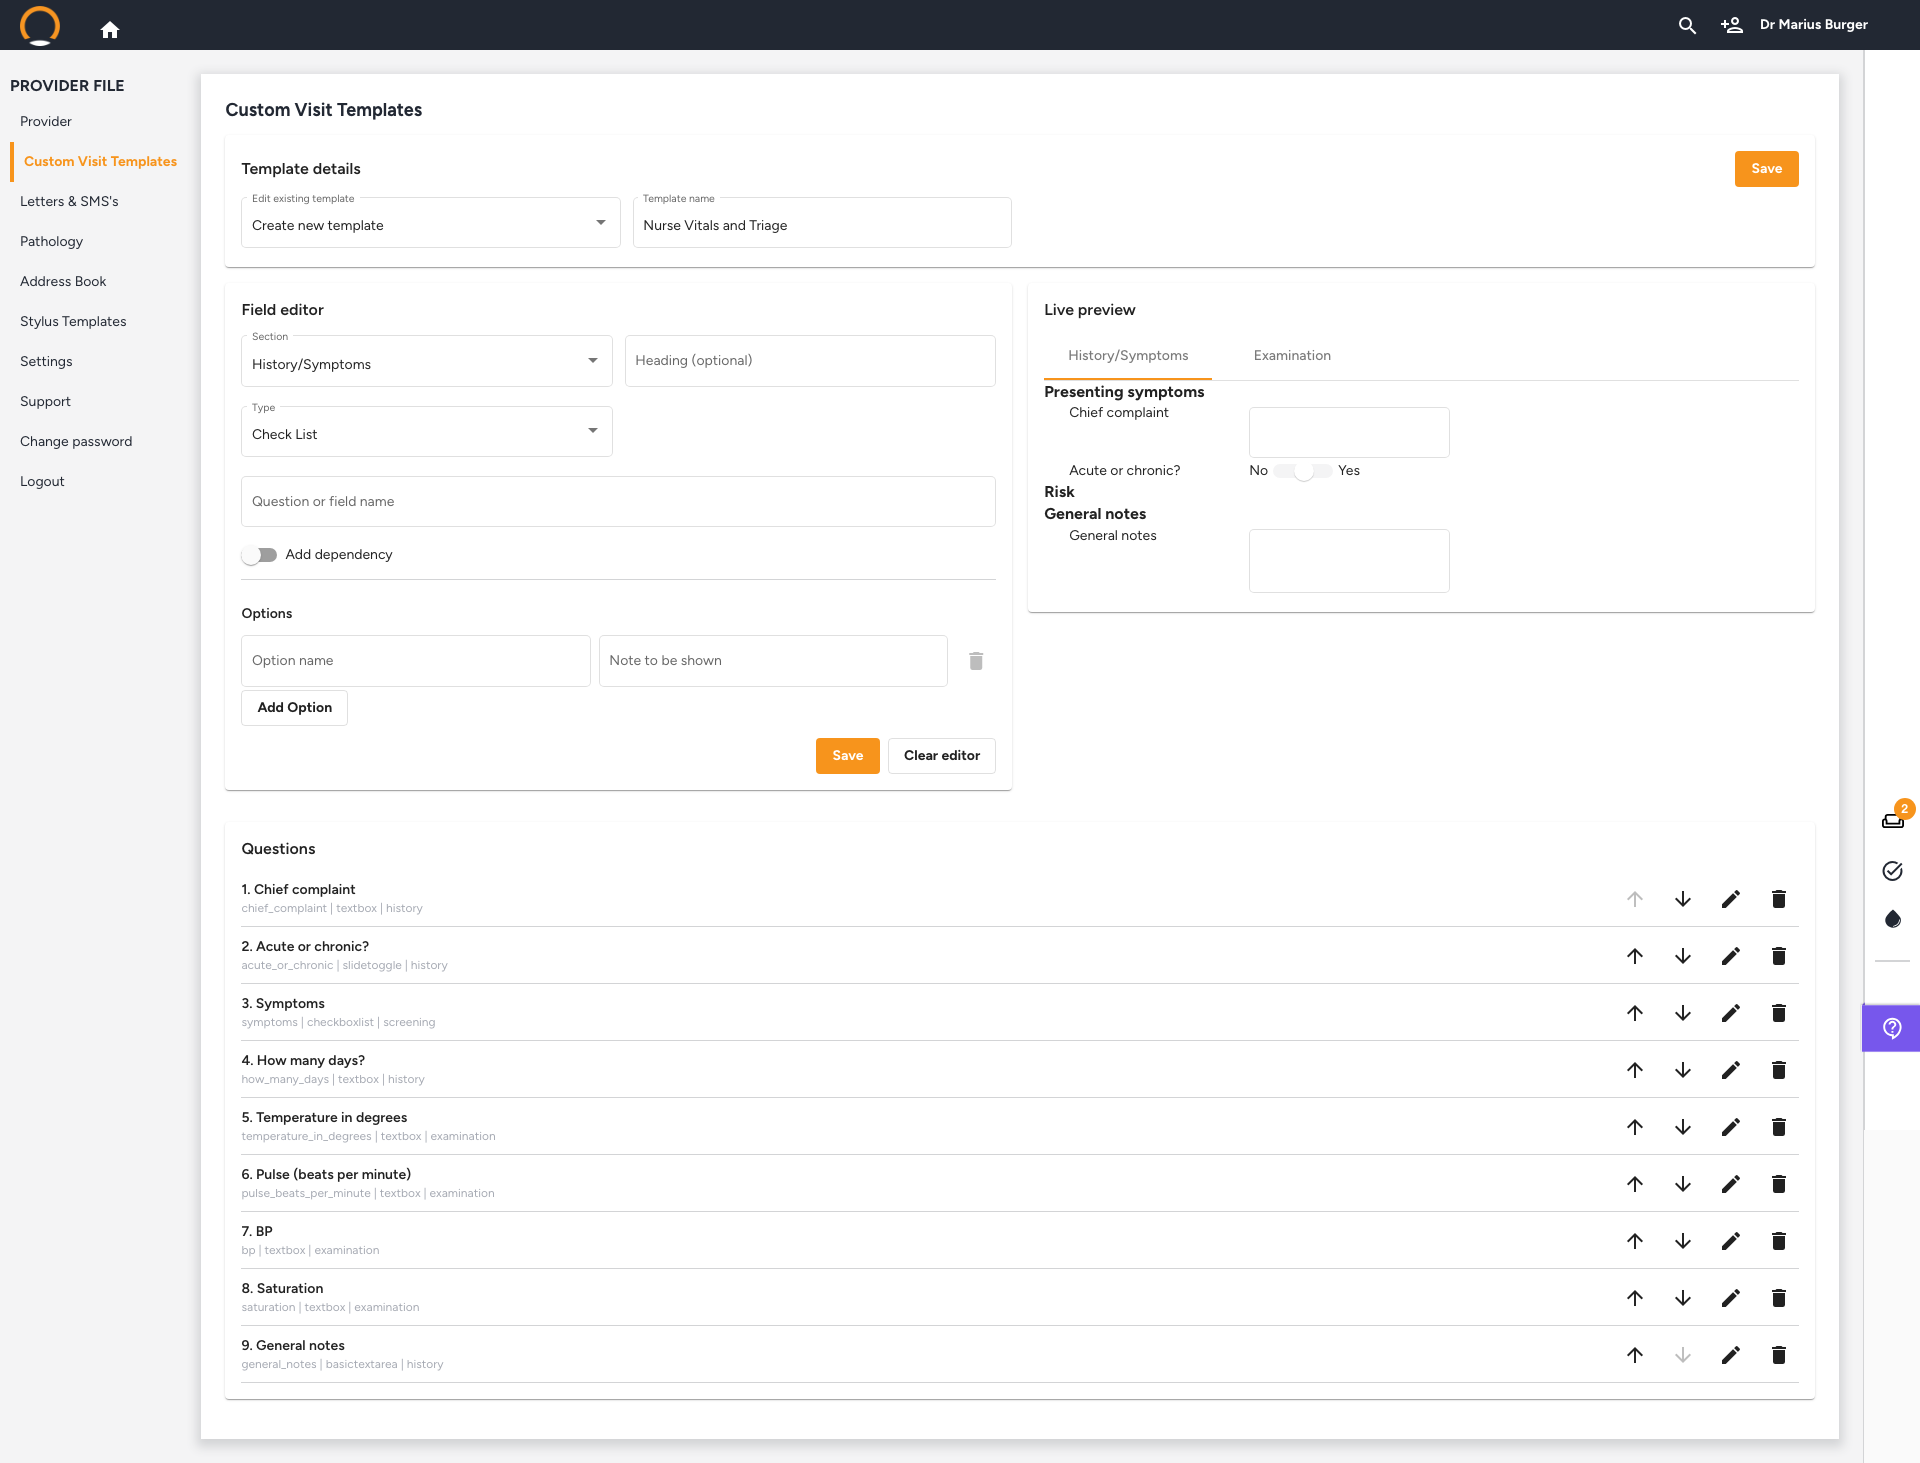
Note the heading name "Risk" is reused across two different Sections (Screening and History/Symptoms), a heading only groups fields within whichever tab they land on, it doesn't itself decide which tab that is.
"Psych Depression Follow-up" a specialty-specific example for a psychiatry or psychology follow-up consult, kept entirely on the Symptoms tab by choice, and fully working since nothing depends on Screening:
- History/Symptoms, heading "Mood": a Check List "Mood" with options like Anxious and Stable.
- Same heading: a Number field "Mood rating" (e.g. on a 1–10 scale, decide and state your own scale direction, since the field itself doesn't label which end is better).
- History/Symptoms, heading "Risk": a Slide Toggle "Suicidal ideation present?" a good candidate for its own dependency, e.g. a follow-up field such as "Referred for intervention" that only appears if the answer is Yes.
- History/Symptoms, heading "Plan": an Expanding text box "Follow-up plan".
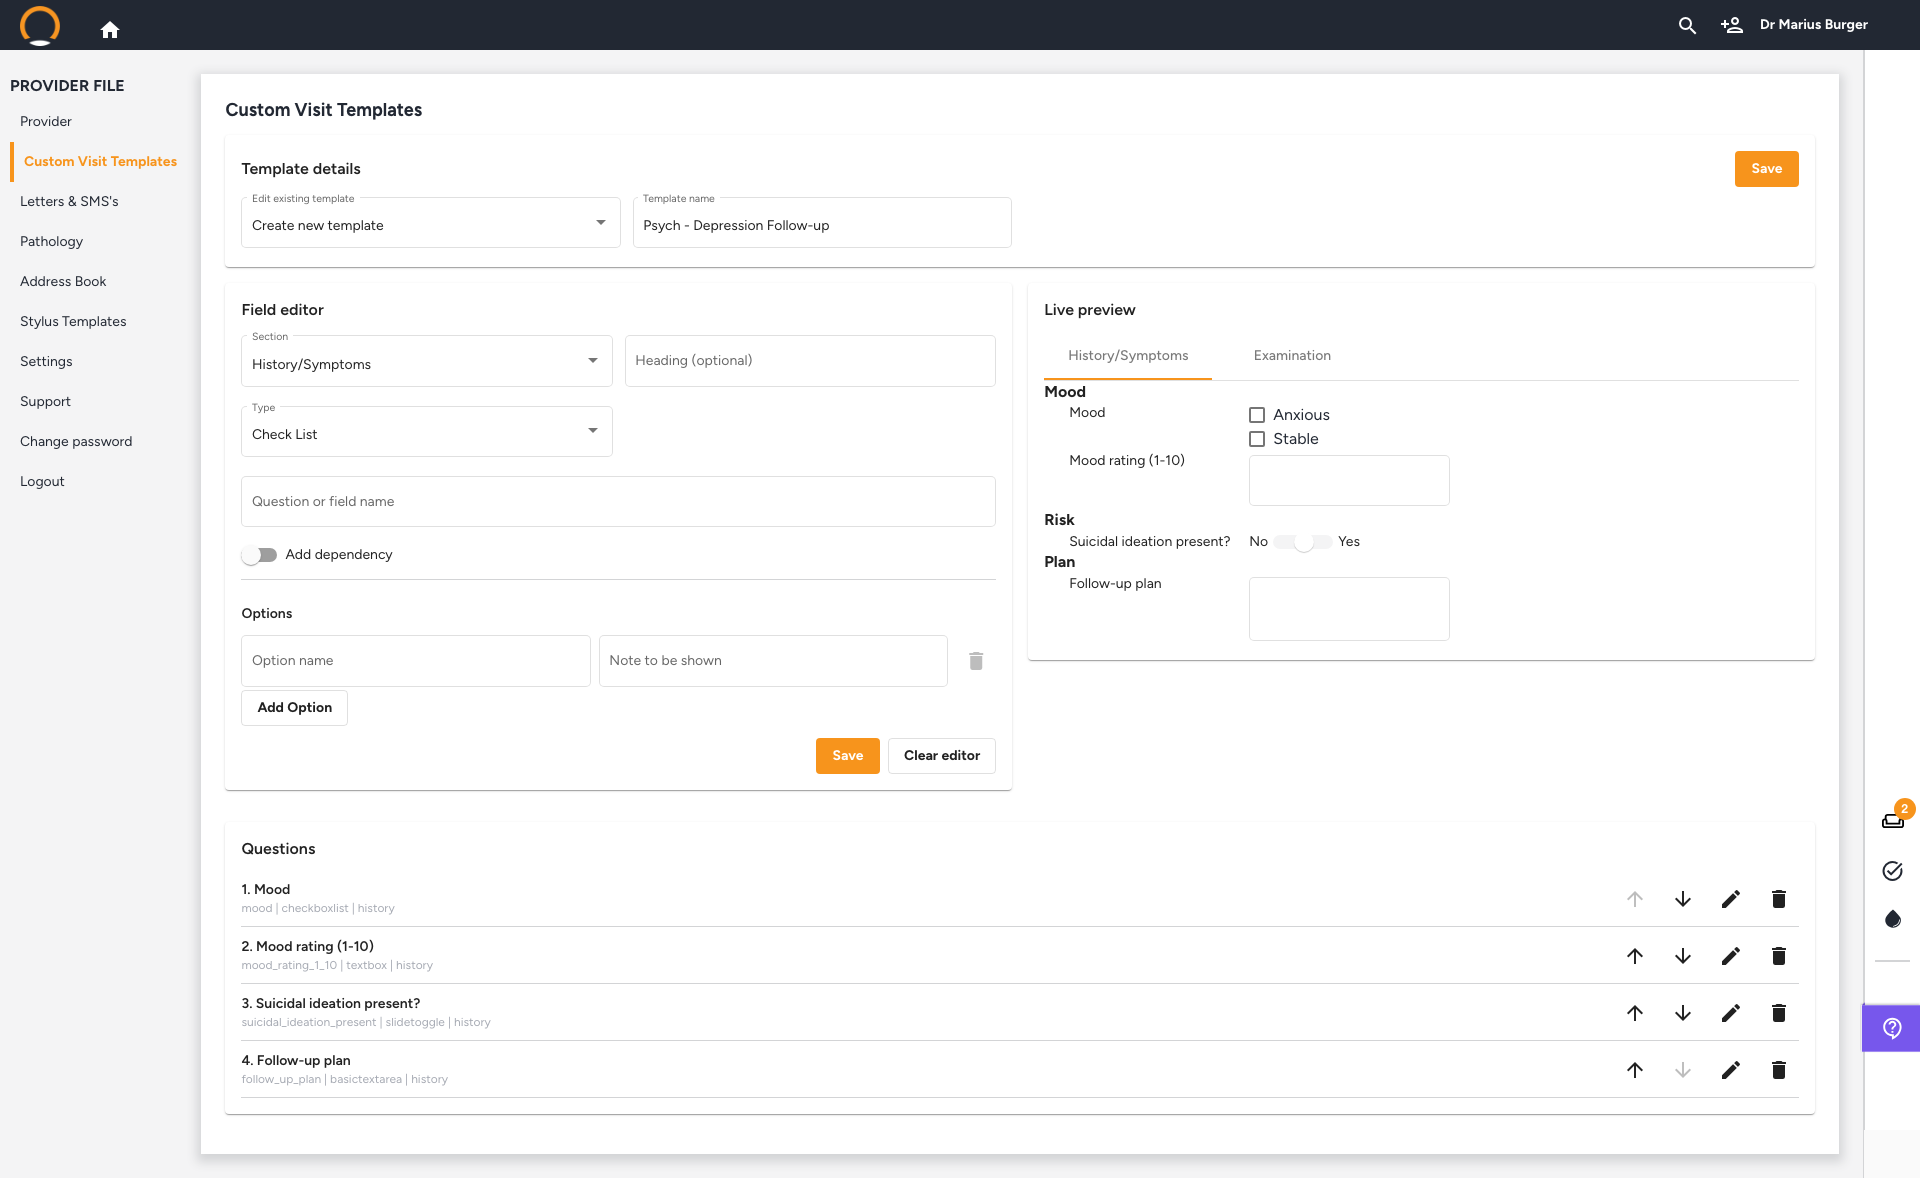
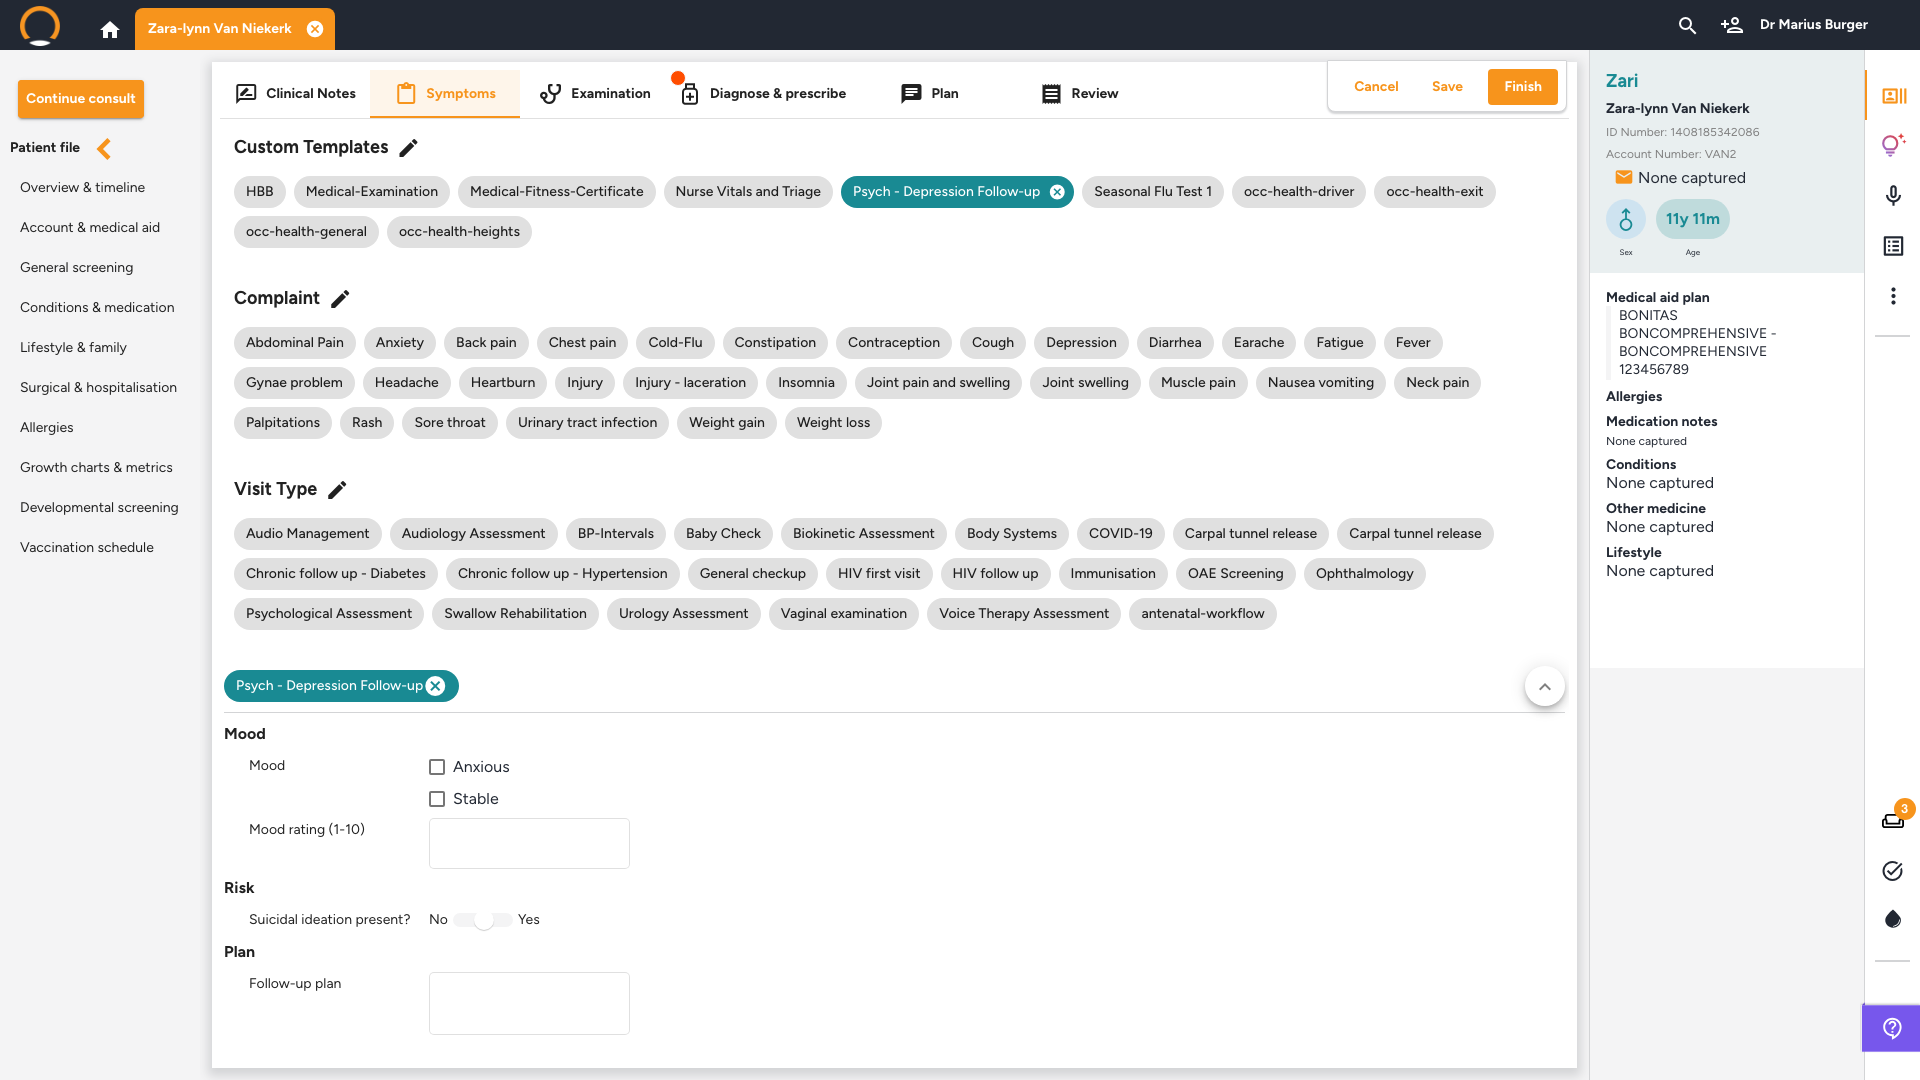
Every field here was deliberately kept on History/Symptoms. Confirmed live: applying the template still adds a sub-tab named "Psych - Depression Follow-up" to the Examination tab regardless, it's just empty, since no fields were assigned there. The sub-tab appears whenever a template is applied at all, not only when it has Examination fields to show.
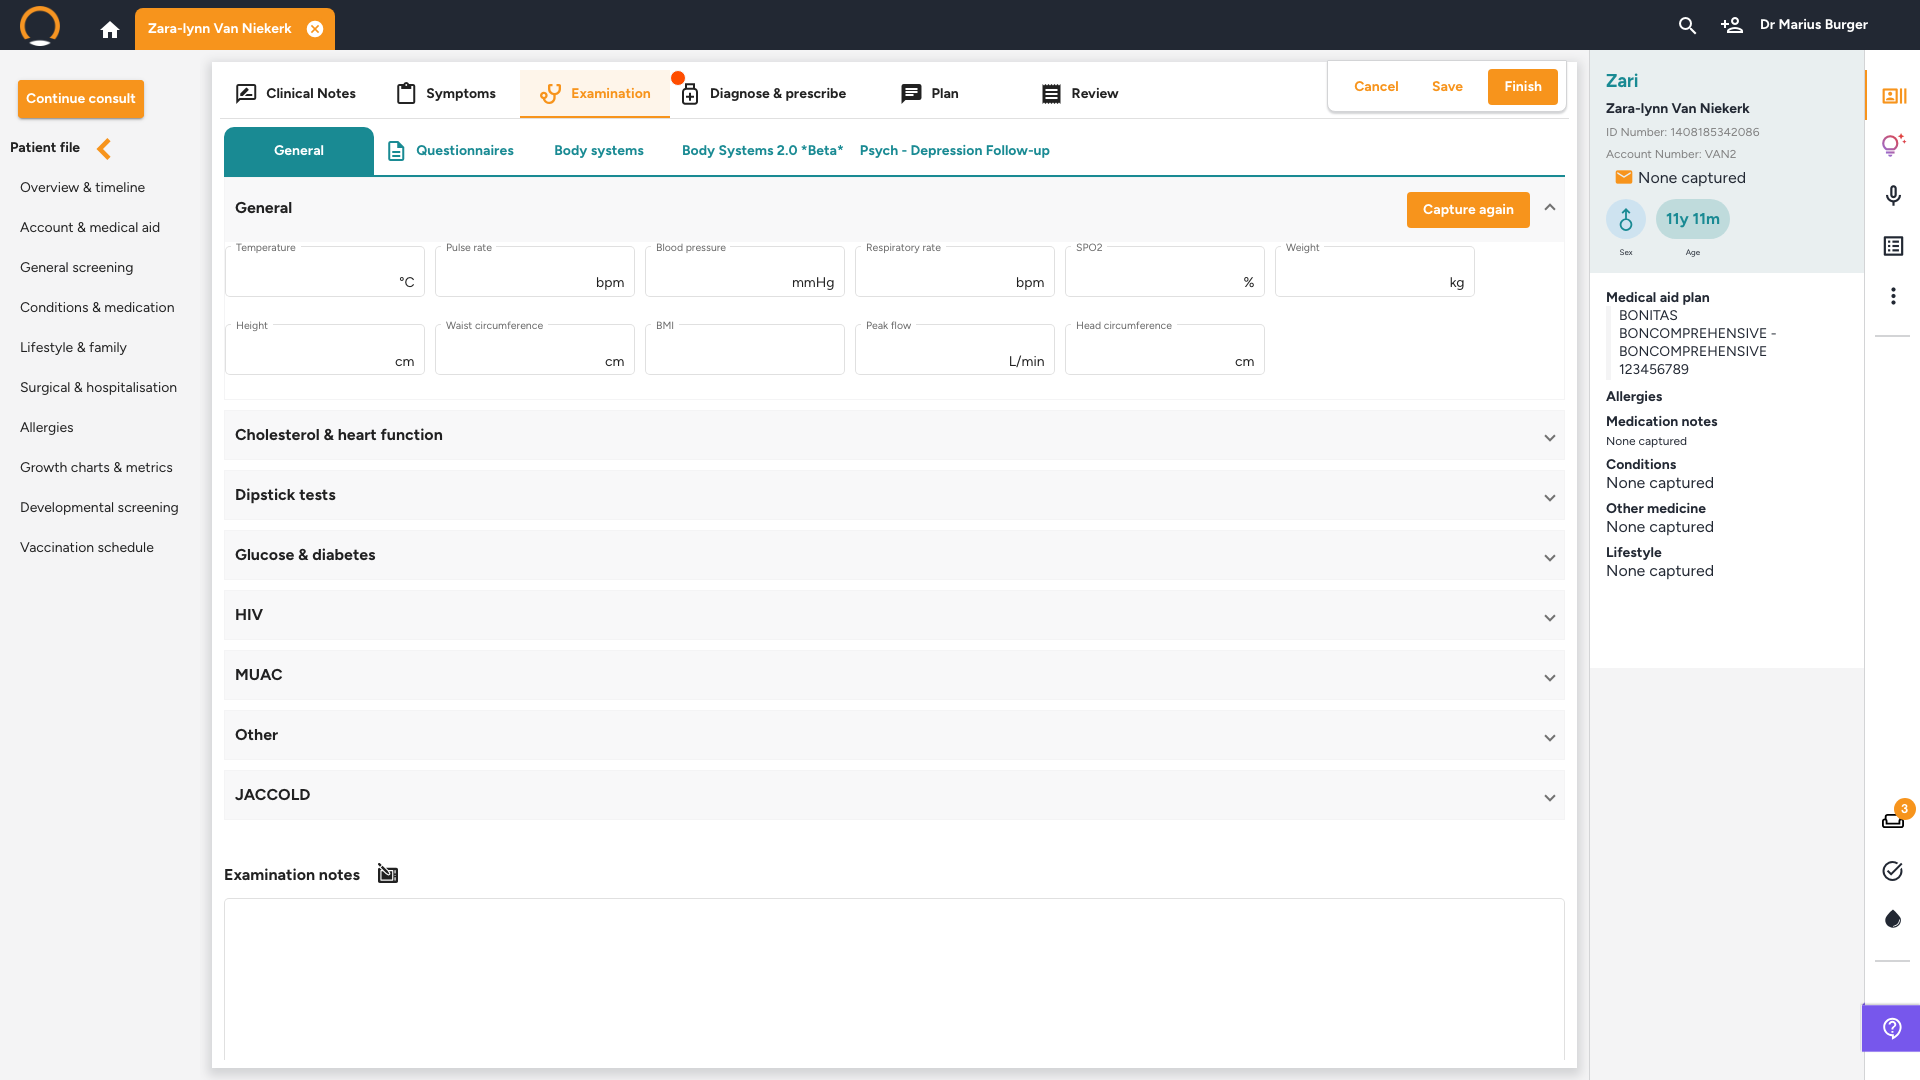
Healthbridge's team pairs this kind of template with the built-in Questionnaires (PHQ-9, GAD-7, and others) rather than duplicating them as custom fields, see How to Use Questionnaires. Once both are captured, a Clinical Assistant document generator (e.g. Motivation Letter or Referral Letter) can pull from the template's answers and the questionnaire's score in the same document, the same integration described in the FAQ below.
Frequently asked questions
Q: Where does the data go once a template is used in a consultation?
It doesn't feed into myMPS or Healthbridge Nova. Everything captured through a custom field is stored directly on the patient's timeline, the same as any other consultation note. That means it's available to the Clinical Assistant's document generators alongside everything else, for example, a Motivation Letter or Referral Letter can pull answers straight from your template and a completed Questionnaire's score into the same generated document, per Healthbridge's product team.
Q: Can I delete a saved template?
Yes. Select it under 'Edit existing template', then click the trash icon next to the Template name field. A confirmation dialog explains that this removes it from the Custom Visit Templates list, but doesn't delete the underlying questions data, so it's a safe way to retire a template without worrying about the patients who already have data captured against it.
Q: What's the difference between 'Custom Templates' and the 'Complaint' / 'Visit Type' pills next to it?
Per Healthbridge's product team: Complaint and Visit Type lists are set up by Healthbridge on the provider's behalf, mainly based on the provider's specialty (so a paediatric practice sees different defaults to a GP). Custom Templates is the one list a provider manages themselves, from the UI in this guide, without needing Healthbridge to make the change. If you want something added to Complaint or Visit Type instead of a Custom Template, that goes through your Business Consultant, not this page.
Q: What's the difference between this, Letters & SMS templates, and Billing and Procedure Templates?
Three distinct features share the word "template". Custom Visit Templates (this guide) build note-taking fields for the Symptoms and Examination tabs. Letters & SMS templates are reusable letter and SMS wording. Billing and Procedure Templates are reusable bundles of invoice line items. None of the three overlap.
Q: Why doesn't my dependent field show up in the Live Preview yet?
That's expected. A field with a dependency only renders once its trigger option is actually selected, in the Live Preview, or later during a real consultation. Tick the option it depends on to see it appear.
Q: Can I get an industry-recognised questionnaire added, rather than building it as custom fields myself?
Yes. If you want a standardised, industry-recognised questionnaire available in Healthbridge Clinical, send the request through to your Business Consultant as an enhancement request rather than rebuilding it field by field here, that keeps it consistent with the built-in Questionnaires (PHQ-9, GAD-7, and others) rather than a one-off custom version.
Q: My practice needs a large, complex template, can Healthbridge build it for us?
Yes. Reach out to Healthbridge Support or your Business Consultant, they can help build a large or complex template on your behalf rather than you having to construct every field yourself. You'll still be able to reorder or tweak individual fields afterwards from this page once it's set up.